I still remember the first time I stumbled upon a beautifully styled flat lay at a fiber festival. It was as if the yarn, needles, and fabric had come together to tell a story. I was captivated by the way the colors and textures complemented each other, and I knew right then that I wanted to learn more about what is a flat lay and how to create one. As someone who’s always on the lookout for new ways to showcase the beauty of handmade crafts, I’ve often found myself wondering how to recreate those stunning visuals.
As I delved deeper into the world of flat lays, I realized that it’s not just about arranging objects in a pretty way – it’s about telling a story through your arrangement. In this article, I’ll share my own experiences and tips on what is a flat lay and how to create one, from choosing the right backdrop to styling your props. I’ll cut through the noise and give you honest, practical advice on how to create stunning flat lays that showcase your handmade crafts in the best possible light. Whether you’re a seasoned maker or just starting out, I hope to inspire you to experiment with flat lays and discover the joy of visual storytelling.
Table of Contents
- Guide Overview: What You'll Need
- Step-by-Step Instructions
- Uncovering Flat Lay Magic
- Uncovering Flat Lay Secrets
- Flat Lay Photography Tips and Styling Secrets
- Styling a Flat Lay Composition
- Using Props in Flat Lay Photography
- What Is a Flat Lay and How to Create One
- Weaving Together the Essentials: 5 Key Tips for Creating a Stunning Flat Lay
- 3 Essential Takeaways for Crafting Stunning Flat Lays
- The Art of Flat Lay Storytelling
- Weaving Together the Threads of Flat Lay Magic
- Frequently Asked Questions
Guide Overview: What You'll Need

Total Time: 30 minutes to 1 hour
Estimated Cost: $0 – $10
Difficulty Level: Easy
Tools Required
- Camera (smartphone camera or DSLR)
- Tripod (optional)
- Editing software (e.g., Adobe Lightroom, Photoshop)
Supplies & Materials
- Flat surface (e.g., table, floor)
- Background material (e.g., paper, fabric, wood)
- Products or objects to feature (e.g., clothing, accessories, food)
- Styling props (e.g., flowers, books, decorative items)
- Measuring tape or ruler (to ensure items are 6 inches to 12 inches apart)
Step-by-Step Instructions
- 1. First, let’s start with the basics: a flat lay is a type of still life photography where objects are arranged on a flat surface and shot from directly above. To create one, you’ll need a few simple tools, like a camera or smartphone, a tripod, and a flat surface to work on. I’ve seen some amazing makers use old doors, tables, or even the floor as their flat surface.
- 2. Next, think about the story you want your flat lay to tell. What are you trying to showcase? Is it a finished project, a work in progress, or a collection of your favorite yarns? For me, it’s all about capturing the essence of the maker and their craft. Consider the colors, textures, and overall aesthetic you want to convey, and start gathering objects that fit your vision.
- 3. Now it’s time to set the scene. Choose a background that complements your objects, like a simple colored paper, a textured fabric, or even a natural surface like wood or stone. I’ve had great success with using old project bags or scarves as backgrounds – they add a pop of color and interest to the photo. Make sure your background is large enough to accommodate all your objects, and smooth out any wrinkles or creases.
- 4. Start arranging your objects on the flat surface, considering the rule of thirds. You want to create a visually appealing composition, so try to balance your objects in a way that leads the viewer’s eye through the photo. Don’t be afraid to experiment and move things around until it feels right – and don’t worry if it’s not perfect, that’s all part of the charm.
- 5. As you’re arranging your objects, think about adding depth and dimension to your flat lay. You can do this by layering objects, using props like buttons or beads, or even incorporating natural elements like leaves or flowers. I’ve seen some amazing makers use vintage sewing notions or antique buttons to add a touch of whimsy to their photos.
- 6. Once you’re happy with your arrangement, it’s time to get your camera ready. If you’re using a tripod, make sure it’s level and sturdy. If you’re shooting with a smartphone, consider using a remote shutter release or the timer function to avoid camera shake. Take a few test shots to make sure your lighting is good – natural light is always best, but if you’re shooting indoors, try to position yourself near a window or use a light box.
- 7. Now it’s time to refine your shot. Check your test photos for any adjustments you need to make – is the lighting even? Are the objects in focus? Do you need to make any tweaks to the composition? Take your time, and don’t be afraid to take multiple shots until you get the one that feels just right. And remember, the goal is to have fun and tell a story with your flat lay – so don’t stress too much about perfection.
Uncovering Flat Lay Magic
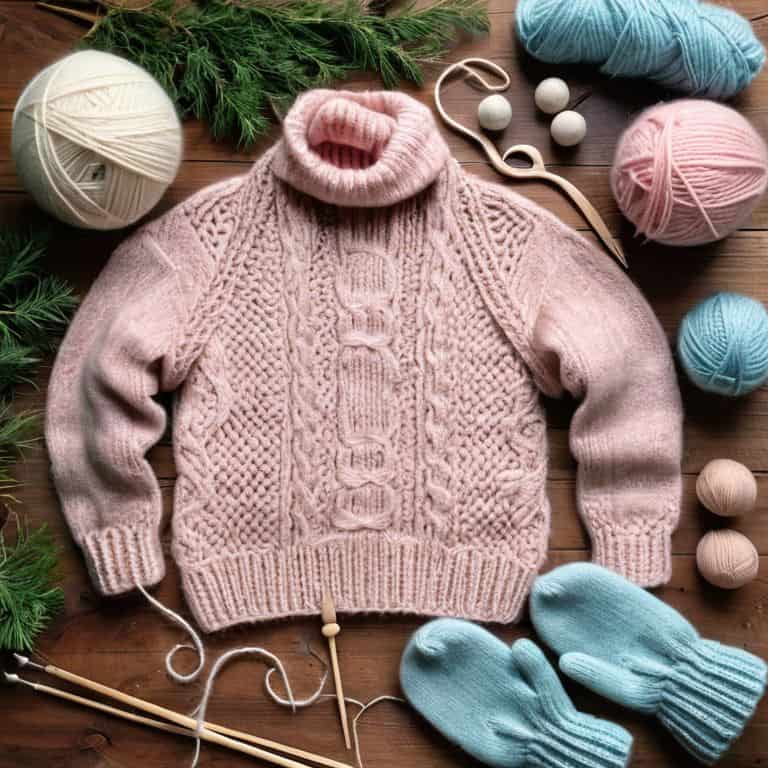
As I’ve traveled to various fiber festivals, I’ve noticed that _styling ideas for flat lay_ can make or break the visual appeal of a handmade craft. To add some personality to your flat lay, consider incorporating props that tell a story. For instance, if you’re showcasing a hand-knitted scarf, you could include a few skeins of yarn, a pair of knitting needles, or even a book of patterns. These small details can help create a cozy atmosphere that invites the viewer to engage with your craft.
When it comes to flat lay composition techniques, I’ve found that simplicity is key. Don’t be afraid to experiment with different layouts, but remember that sometimes less is more. A cluttered flat lay can be overwhelming, so try to strike a balance between showcasing your craft and leaving some negative space. This will help draw the viewer’s eye to the main attraction: your beautiful handmade item. As I always say, “What are you working on?” – and a well-crafted flat lay can be a great way to share your story.
To take your flat lay photography to the next level, consider investing in a good camera and editing software. Flat lay lighting setups can be as simple as natural light or as complex as a professional studio setup. Regardless of your approach, the key is to find a lighting solution that complements your craft and enhances its features. With a little practice and patience, you can create stunning flat lay photos that showcase your handmade items in the best possible light.
Uncovering Flat Lay Secrets
As I’ve traveled to various fiber festivals, I’ve noticed that flat lay photography tips can make all the difference in showcasing handmade crafts. One of my favorite things to do is collect unique props from indie makers to use in my own flat lay compositions. I’ve found that styling a flat lay composition is all about telling a story, and the right props can help convey that narrative.
When it comes to using props in flat lay photography, I believe that less is often more. A simple, well-placed prop can add depth and interest to an image without overwhelming the viewer. I’ve also experimented with flat lay lighting techniques, and I’ve found that natural light is often the most flattering. Whether I’m photographing a skein of yarn or a finished project, I try to position it near a window to capture the soft, warm glow of natural light.
As I continue to learn and grow as a photographer, I’m excited to explore new ways of creating a themed flat lay. I’ve been inspired by the work of other makers and photographers, and I’m eager to try out new flat lay photography equipment and techniques. Whether I’m shooting with a professional camera or just my smartphone, I know that the key to a great flat lay is to have fun and be creative.
Flat Lay Photography Tips and Styling Secrets
As I’ve traveled to fiber festivals and met incredible makers, I’ve noticed that the most stunning flat lays are those that tell a story. It’s not just about arranging yarn and props – it’s about evoking a feeling. To capture that essence, play with textures, colors, and lighting. Consider the mood you want to convey: is it cozy and intimate, or bright and playful? Experiment with different backgrounds, from rustic wood to soft fabrics, to add depth and interest. And don’t be afraid to get creative with your props – a well-placed spindle or ball of yarn can make all the difference.
When styling your flat lay, remember that less is often more. Allow each element to breathe, and don’t overcrowd the scene. I’ve seen makers use a single, beautifully crafted item as the focal point, surrounded by subtle accents that enhance its beauty. By striking this balance, you’ll create a visually appealing image that draws the viewer in and invites them to explore the story behind your craft.
Styling a Flat Lay Composition
When it comes to styling a flat lay composition, I think about the stories I’ve heard from designers and makers at fiber festivals. They always talk about the importance of balance and harmony in their work. For me, that means playing with textures, colors, and shapes to create a visually appealing arrangement. I might pair a soft, pastel-colored yarn with a handmade wooden tool or a vintage knitting pattern to add some depth and interest.
As I’m styling, I ask myself, “What’s the story I want to tell with this flat lay?” Is it about the beauty of a particular yarn, or the craftsmanship of a handmade item? By considering the narrative behind the objects, I can create a composition that’s not just pretty, but also meaningful and engaging.
Using Props in Flat Lay Photography
I love how a simple prop can elevate a flat lay from nice to wow. For me, it’s all about adding a personal touch – like a handmade project bag or a favorite spinning tool. When I’m styling a flat lay, I like to think about the story I want to tell. What’s the project about? Who made the yarn or the fabric? Adding a relevant prop can help answer those questions and draw the viewer in. Maybe it’s a ball of yarn, a pair of knitting needles, or even a book that inspired the project. Whatever it is, it should add to the narrative and make the viewer feel like they’re part of the story.
What Is a Flat Lay and How to Create One
As I’ve traveled to fiber festivals and spoken to makers from all walks of life, I’ve noticed that the most captivating flat lays often tell a story. They’re not just about arranging objects in a visually pleasing way, but about conveying the personality and passion of the creator. I recall a conversation with a talented indie dyer who used her flat lays to showcase not just her yarns, but also the flowers and herbs that inspired her color palette. It was a beautiful way to connect with her audience and share the story behind her craft.
By incorporating personal touches and meaningful objects into your flat lay, you can create a sense of intimacy and authenticity that draws the viewer in. Whether it’s a handmade project bag, a favorite spinning tool, or a snippet of yarn that holds special meaning, these details can help your flat lay feel more like a reflection of your unique perspective and creative voice.
Weaving Together the Essentials: 5 Key Tips for Creating a Stunning Flat Lay
- Start with a clean and simple background that complements the colors and textures of your handmade crafts
- Play with layers and textures by combining different materials, such as wood, fabric, or paper, to add depth to your flat lay
- Experiment with natural light by placing your flat lay near a window or outside to capture soft, warm illumination
- Tell a story with your flat lay by incorporating personal or meaningful objects that reflect your brand or crafting style
- Don’t be afraid to get creative and try new things – move items around, adjust your angles, and have fun with the process of capturing the perfect flat lay
3 Essential Takeaways for Crafting Stunning Flat Lays
As you experiment with flat lays, remember that storytelling is key – every skein of yarn, every handmade craft, and every detail tells a part of your unique story
Lighting and styling are crucial elements of a great flat lay, but don’t be afraid to add your personal touch and make it reflective of your brand and aesthetic
Practice makes perfect, so keep trying new things, experimenting with different compositions, and having fun with the process – and don’t forget to share your favorite flat lay creations with the community
The Art of Flat Lay Storytelling
To me, a flat lay is more than just a photo – it’s a canvas that weaves together the threads of a maker’s story, showcasing not just their craft, but their passion, their creativity, and their unique perspective.
Noah Byrne
Weaving Together the Threads of Flat Lay Magic
As I reflect on our journey through the world of flat lays, I’m reminded of the power of storytelling that unfolds when we combine beautiful images with the passion of makers. From understanding what a flat lay is, to learning how to create one, and finally, to uncovering the magic that happens when we style and photograph our handmade crafts, it’s clear that this art form is about so much more than just arranging objects on a surface. It’s about sharing our vision and connecting with others who appreciate the beauty in the everyday, the handmade, and the unique.
So, as you embark on your own flat lay adventures, remember that the true beauty of flat lay photography lies not just in the images you create, but in the stories they tell. Whether you’re a seasoned maker or just starting out, I encourage you to keep exploring, to keep creating, and to always ask yourself, ‘What are you working on?’ – because in the end, it’s the people and the stories behind the craft that make it truly special.
Frequently Asked Questions
What are the essential props and backdrops for creating a visually appealing flat lay?
For me, the perfect flat lay is all about telling a story. I love using natural textures like wood or stone as backdrops, and adding props like vintage spindles, balls of yarn, or handmade ceramics to bring warmth and personality to the scene.
How do I balance the colors and textures in my flat lay to make it more engaging?
For me, balancing colors and textures in a flat lay is all about telling a story. I like to mix and match different hues and materials to create a visually appealing narrative. Ask yourself, “What’s the theme of my flat lay?” and let that guide your choices. Experiment with contrasting textures and colors to add depth and interest – it’s all about finding that perfect harmony.
Can I use natural light or do I need special lighting equipment to capture high-quality flat lay photos?
Natural light is your best friend when it comes to capturing stunning flat lay photos. I’ve seen makers use window seats, outdoor tables, or even shoot near a skylight to get that perfect soft light. You don’t necessarily need special equipment, just find a spot with plenty of indirect sunlight and you’re golden!