As I sit in my studio, surrounded by threads of every color and texture, I’m reminded of the common misconception that creating a stunning piece of woven art requires years of experience. But I’m here to tell you that learning how to create a color block woven wall hanging is within reach, regardless of your skill level. I’ve seen many people underestimate the simplicity and beauty of weaving, and it’s a shame, because with the right guidance, anyone can craft a breathtaking piece that adds a touch of handmade architecture to their space.
In this article, I’ll share my personal approach to weaving, which I like to call _building with yarn_. You’ll learn the practical steps to create a vibrant color block woven wall hanging, from selecting the perfect threads to finishing the final weave. I’ll provide you with honest, no-hype advice on how to bring your design to life, and by the end of this guide, you’ll be equipped with the knowledge and confidence to create your own unique piece of woven art. Whether you’re a seasoned weaver or just starting out, I invite you to join me on this journey to explore the intersection of modern design and ancient craft.
Table of Contents
Guide Overview: What You'll Need
Total Time: 3 hours 15 minutes
Estimated Cost: $40 – $70
Difficulty Level: Intermediate
Tools Required
- Loom (or a simple frame loom)
- Scissors (sharp and dedicated to cutting yarn)
- Tapestry Needle (for weaving)
- Measuring Tape (for measuring 12 inches by 24 inches of fabric)
- Ruler (for cutting straight edges on 2 inches by 4 inches lumber)
- Pencil (for marking patterns on the loom)
Supplies & Materials
- Worsted Weight Yarn (in 3-5 different colors)
- Wooden Dowel (1/4 inches diameter, 36 inches long)
- Cotton Rope (for hanging, approximately 6 feet long)
- Fabric (for backing, approximately 18 inches by 30 inches)
- Thread (for sewing the edges)
- Batting (optional, for added texture)
- D-Ring Hangers (2, for hanging the wall hanging)
Step-by-Step Instructions
- 1. To start, let’s gather our materials, which will include a simple frame loom or a rigid heddle loom, a variety of yarns in different colors and textures, scissors, a shuttle or pick-up stick, and a measuring tape. I find that using natural fibers like wool, cotton, or linen adds a unique character to the piece.
- 2. Next, we need to plan our design, considering the size of the wall hanging, the colors we want to use, and the pattern we wish to create. I like to sketch out my ideas on graph paper, thinking of the weaving as a form of building with yarn. This step is crucial in visualizing the final piece and making any necessary adjustments before we begin.
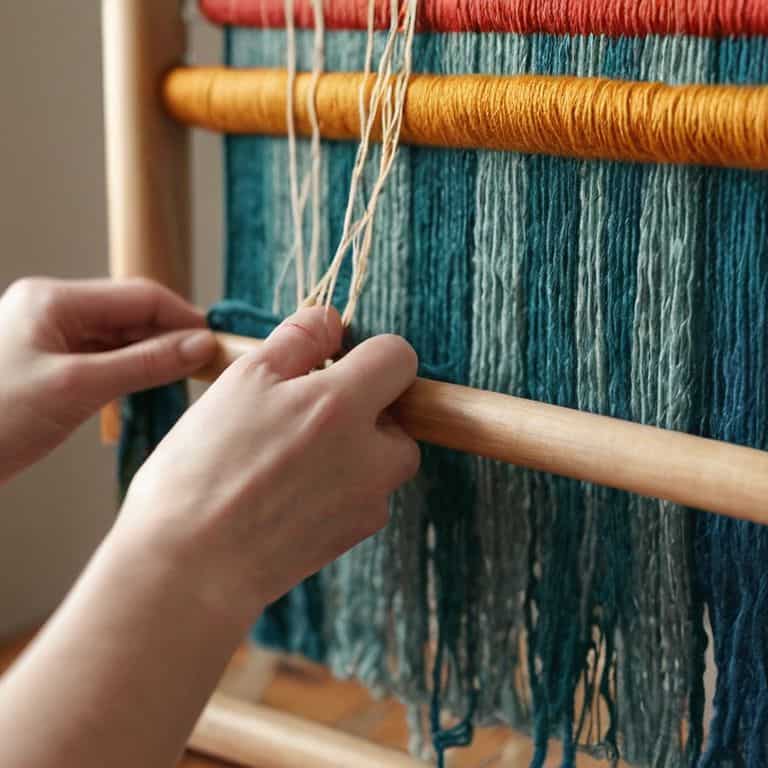
- 3. Now, let’s set up our loom, which involves stretching the warp threads across the loom and securing them. This is a bit like laying the foundation of a building, where precision and patience are key. Make sure the threads are evenly spaced and not too tight or too loose, as this will affect the final texture of the weaving.
- 4. With our loom set up, we can start weaving our first row, using a simple over-under pattern to establish the base of our color block design. I find that using a consistent pattern helps to create a sense of unity and balance in the piece. As we weave, let’s focus on maintaining an even tension, which will be crucial for the overall texture and stability of the wall hanging.
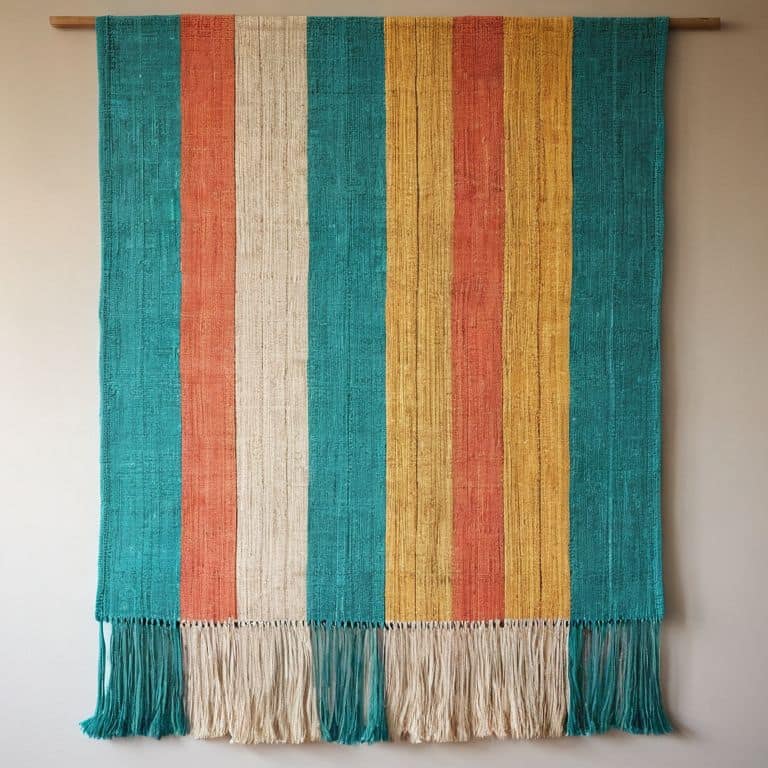
- 5. As we move on to the next rows, we can start introducing our color blocks, switching between different yarns to create the desired pattern. This is where the magic happens, and our design starts to take shape. Remember to leave a small gap between each color block to create a clear definition between the different sections.
- 6. To add some extra depth and interest to our wall hanging, let’s experiment with different textures, incorporating yarns with varying weights and fibers. This could include adding some thick, chunky yarns for a more rustic look or using thin, smooth yarns for a more refined appearance.
- 7. Once we’ve completed our weaving, it’s time to finish the edges, which involves securing the last row of weaving and trimming the excess yarn. This is an important step, as it will help prevent the weaving from unraveling over time. I like to use a simple hemstitch to finish the edges, which adds a touch of elegance to the final piece.
- 8. Finally, let’s hang our wall hanging, stepping back to admire our handiwork and making any necessary adjustments to the placement and level of the piece. This is the moment we’ve been waiting for – seeing our color block woven wall hanging come to life and add a touch of handmade beauty to our space.
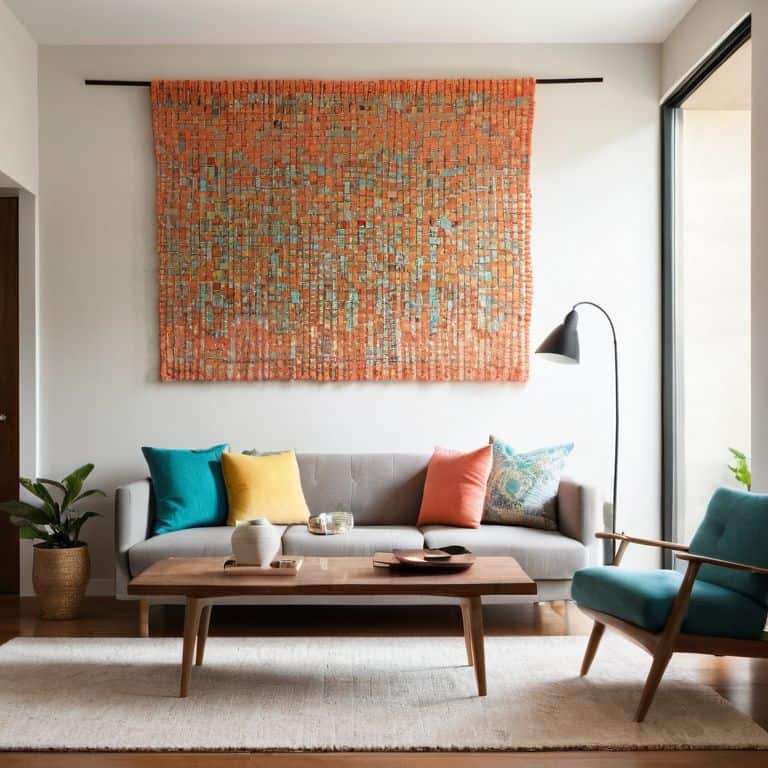
Weaving Colorful Stories

As I delve into the world of color block weaving, I’m reminded of the importance of texture and form in creating a visually stunning piece. The way threads intersect and overlap can add depth and dimension to a simple design, making it a true work of art. When experimenting with different color block weaving patterns, I like to consider the emotional impact of each hue and how they interact with one another.
To add an extra layer of visual interest to your wall hanging, try incorporating geometric pattern inspiration into your design. This can be as simple as alternating between two complementary colors or as complex as creating a intricate mosaic pattern. The key is to have fun and experiment with different combinations until you find one that resonates with you. By embracing modern wall decor ideas, you can create a unique and eye-catching piece that reflects your personal style.
As a beginner, it’s essential to remember that weaving is a process, and it’s okay to make mistakes. In fact, some of the most beautiful pieces come from beginner friendly weaving techniques that are unapologetically imperfect. Don’t be afraid to try new things and step outside your comfort zone – it’s often where the most magic happens. With practice and patience, you’ll be creating stunning woven wall hangings that tell a story and bring a touch of handmade charm to any room.
Simple Wall Hanging Designs Evolved
As I delve deeper into the world of color block weaving, I find myself fascinated by the evolution of simple wall hanging designs. What begins as a basic concept can quickly transform into a complex tapestry of texture and hue. I’ve seen it time and time again in my own work – a simple idea, carefully crafted and nurtured, can blossom into a stunning work of art. The key is to experiment, to push the boundaries of what’s possible with thread and yarn.
By introducing new colors, textures, and patterns, even the most basic design can be elevated to new heights. I’ve found that incorporating natural fibers, like linen or raw silk, can add a depth and richness to a piece that’s hard to achieve with synthetic materials. As I continue to explore the possibilities of color block weaving, I’m constantly amazed by the beauty and complexity that can emerge from a simple idea, carefully woven into being.
Unlocking Color Block Weaving Patterns
As I delve deeper into the world of color block weaving, I’m constantly fascinated by the endless patterns that can be created. By combining different hues and textures, I can craft unique stories that unfold with each thread. I love experimenting with contrasting colors to create a sense of depth and visual interest. For instance, pairing a rich, dark blue with a vibrant orange can evoke a sense of energy and playfulness.
To unlock these patterns, I often start by sketching out ideas on graph paper, much like I would when designing a building. This helps me visualize the relationships between colors and textures, allowing me to refine my design before bringing it to life on the loom. By embracing the intersection of art and architecture, I can create intricate, layered patterns that add depth and emotion to my woven pieces.
Elevating Your Wall Hanging: 5 Essential Tips for Color Block Weaving
- Balance your color palette by considering the 60-30-10 rule, where 60% of your wall hanging features a dominant color, 30% a secondary color, and 10% an accent color, to create visual harmony
- Experiment with different yarn textures to add depth and tactility to your color block design, blending smooth and rough fibers for a captivating visual effect
- Play with scale by varying the size of your color blocks, from small, intricate squares to large, statement-making rectangles, to create a dynamic and engaging piece of woven art
- Consider the negative space around your color blocks, using it to create a sense of breathing room and visual balance, and to prevent your wall hanging from feeling too cluttered or overwhelming
- Don’t be afraid to break the rules and try unconventional color combinations, using your intuition and personal taste to guide your design decisions and create a truly unique and eye-catching color block woven wall hanging
Key Takeaways for Crafting a Stunning Color Block Woven Wall Hanging
As you embark on this creative journey, remember that the essence of weaving lies in its tactile nature, and experimenting with different textures and colors can elevate your piece from a simple wall hanging to a work of art.
The process of unlocking color block weaving patterns is not just about following a set of instructions, but about understanding the emotional and aesthetic impact of each thread and yarn you choose, allowing you to weave a story that resonates with your space and personality.
Ultimately, the evolution of simple wall hanging designs into complex, three-dimensional tapestries is a testament to the versatility of weaving as an art form, encouraging you to push the boundaries of what is possible with fiber and thread, and to see each project as an opportunity to build something truly unique and beautiful.
Weaving Wisdom
As I often say, a color block woven wall hanging is not just a decorative piece, but a vibrant intersection of texture, tone, and space – it’s where the art of weaving meets the science of architecture, and the result is a masterpiece that tells a story of its own.
Ethan Thorne
Weaving a Lasting Impression
As we conclude our journey to create a stunning color block woven wall hanging, let’s recap the essential steps that have brought us to this point. We’ve explored the fundamentals of color block weaving patterns, and how to unlock their full potential through simple yet effective designs. By embracing the evolution of simple wall hanging designs, we’ve discovered how to infuse our spaces with vibrant textures and hues, ultimately giving our walls a new dimension of depth and character.
As you embark on your own weaving adventures, remember that the true beauty of this craft lies in its ability to build with yarn, to transform threads into living pieces of art that tell stories and evoke emotions. So, don’t be afraid to experiment, to push the boundaries of what’s possible with fiber and form – for in the world of weaving, every thread is an opportunity to create something truly timeless and breathtakingly beautiful.
Frequently Asked Questions
What are the best types of yarn to use for a color block woven wall hanging to achieve a vibrant and textured look?
For a vibrant and textured look, I recommend using a mix of yarns with different weights and fibers, such as chunky wool, linen, or raw silk. These yarns will add depth and visual interest to your color block design, while their natural textures will catch the light and bring your wall hanging to life.
How do I determine the optimal size and scale of my color block design to fit the space where the wall hanging will be displayed?
To determine the optimal size and scale, I consider the space’s proportions and the desired visual impact. I sketch the room’s dimensions on graph paper, then play with different scales and layouts for my color block design, ensuring it harmonizes with the surrounding architecture and becomes a cohesive piece of woven art.
Can I use a simple loom or do I need a more complex one to create intricate color block patterns and designs in my woven wall hanging?
For intricate color block patterns, I recommend a loom with adjustable tension and a decent number of harnesses. A simple loom can work, but it might limit your design possibilities. Consider a mid-range floor loom or a sturdy table loom – they offer the perfect balance between complexity and creativity, allowing you to build rich textures and patterns with ease.