I still remember the first time I tried to how to read a knitting chart – it was like staring at a secret code that only a select few could decipher. The tiny squares and symbols seemed to dance on the page, leaving me frustrated and wondering if I’d ever be able to create the beautiful, intricate patterns I saw in my favorite knitting books. But as I delved deeper into the world of knitting, I discovered that reading a knitting chart wasn’t rocket science – it just required a clear, step-by-step approach.
In this article, I’ll share my own journey of learning how to read a knitting chart, and provide you with the same no-nonsense guidance that helped me overcome my initial fears. You’ll learn how to break down a chart into manageable pieces, understand the various symbols and abbreviations, and start creating your own stunning knitting projects. My goal is to make the process of learning to read a knitting chart as smooth and enjoyable as possible, so you can focus on the joy of making something beautiful with your own hands.
Table of Contents
Guide Overview: What You'll Need
Total Time: 1 hour 15 minutes
Estimated Cost: free – $10
Difficulty Level: Easy
Tools Required
- Knitting Pattern (with chart)
- Pencil (for marking
Supplies & Materials
- Knitting Yarn for practicing
- Knitting Needles in a size recommended by the pattern
Step-by-Step Instructions
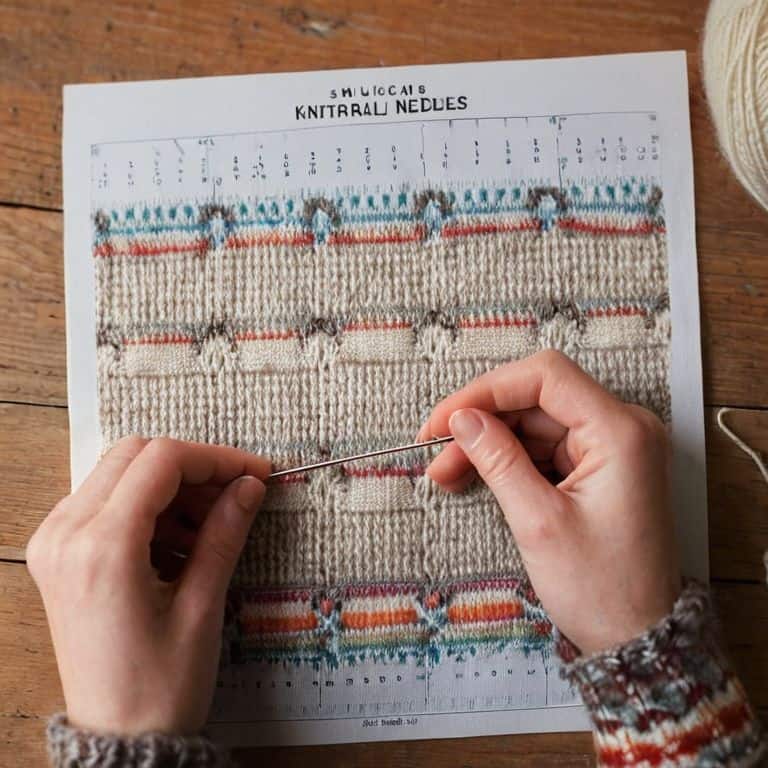
- 1. First, let’s start by understanding the basics of a knitting chart. A knitting chart is a visual representation of the stitches and rows in a knitting pattern, and it’s essential to learn to read it to create beautiful and intricate designs. To begin, find a comfortable and quiet spot to sit and study your chart, and make sure you have a pencil and paper handy to take notes.
- 2. Next, take a closer look at the chart and notice the grid-like structure. This grid is made up of rows and columns, and each square represents a single stitch. The symbols and colors used in the chart will indicate the type of stitch, and it’s crucial to understand what each symbol means. Take your time to study the legend or key provided with the chart, which explains what each symbol represents.
- 3. Now, let’s talk about the rows and columns in the chart. The rows usually represent the horizontal rows of stitches, while the columns represent the vertical sequence of stitches. It’s essential to understand that the right side of the chart typically represents the right side of the knitting, and the wrong side represents the wrong side of the knitting. This might seem like a simple concept, but it’s crucial to get it right to avoid mistakes.
- 4. To start reading the chart, begin with the first row and the first stitch. Look at the symbol in the first square and match it to the legend. This will tell you what type of stitch to make, and you can then proceed to the next square. As you move along the row, make sure to keep track of your place in the chart, using a ruler or a sticky note to mark the row and column you’re currently working on.
- 5. As you become more comfortable reading the chart, you’ll start to notice that some stitches are repeated throughout the row. This is where the chart can become a powerful tool, as it allows you to see the repetitive patterns and anticipate what’s coming next. Take your time to study the repeating patterns, and use this knowledge to your advantage as you knit.
- 6. Now, let’s talk about working with multiple colors. If your chart involves multiple colors, you’ll need to pay close attention to the color changes and make sure you’re using the correct color for each stitch. This can be a bit tricky, but with practice, you’ll become more confident in your ability to manage multiple colors and create beautiful, intricate designs.
- 7. Finally, as you work through the chart, don’t be afraid to take your time and ask for help if you need it. Reading a knitting chart is a skill that takes practice, and it’s okay to make mistakes. The most important thing is to relax and enjoy the process, and remember that it’s okay to frog your work and start again if you need to. With patience and practice, you’ll become a pro at reading knitting charts in no time.
Decoding Knitting Charts
As we delve deeper into the world of knitting charts, it’s essential to develop a solid understanding of understanding knitting abbreviations. These abbreviations are the backbone of any knitting pattern, and being able to decipher them will make your knitting journey much smoother. I like to think of it as learning a new language – once you grasp the basics, you’ll be amazed at how quickly you can pick up new patterns and techniques.
When working with knitting charts, it’s crucial to have a visual guide to knitting symbols handy. This will help you recognize common symbols and abbreviations, such as “k” for knit and “p” for purl. By familiarizing yourself with these symbols, you’ll be able to tackle even the most complex patterns with confidence. Remember, practice makes perfect, so don’t be afraid to try out new techniques and patterns as you become more comfortable with knitting pattern terminology.
As you continue to work with knitting charts, you’ll likely encounter common mistakes in knitting charts, such as misreading a symbol or miscounting stitches. Don’t worry – these mistakes are easy to fix, and with a little patience and practice, you’ll be able to troubleshoot issues with ease. To avoid mistakes, always take your time when reading a chart, and double-check your work as you go. With time and practice, you’ll become a pro at decoding knitting charts and creating beautiful, intricate patterns.
Understanding Knitting Abbreviations
Now that we’ve explored the world of knitting charts, let’s dive deeper into the abbreviations that bring these charts to life. As a craft instructor, I’ve seen many students feel overwhelmed by the array of abbreviations used in knitting patterns. But don’t worry, with a little practice, you’ll be deciphering these codes like a pro! Common abbreviations like “kn” for knit, “purl” for purl, and “st” for stitch are the building blocks of any knitting pattern.
To help you better understand these abbreviations, I’ve compiled a handy list of the most frequently used ones. By familiarizing yourself with these abbreviations, you’ll be able to confidently read and work from knitting charts, and your knitting journey will become even more enjoyable. Remember, practice makes perfect, so don’t be afraid to try out a few swatches to get a feel for how these abbreviations work in action.
Visual Guide to Symbols
Now that we’ve covered the basics of knitting abbreviations, let’s move on to the visual aspects of decoding knitting charts. As we explore the world of symbols, you’ll notice that each one represents a specific stitch or action. I find it helpful to think of these symbols as a secret code, and once you crack it, you’ll be amazed at how easily you can read a knitting chart.
To help you decipher these symbols, I’ve created a detailed guide with photos and illustrations. We’ll go through each symbol together, and I’ll show you how to recognize and work with them. From the basic knit and purl symbols to more complex cables and decreases, we’ll break it down step by step, so you can confidently navigate any knitting chart that comes your way.
5 Essential Tips to Master Knitting Charts

- Start by familiarizing yourself with the chart’s legend or key, which explains what each symbol represents
- Always read the chart from bottom to top, as this is the order in which you’ll be working the stitches
- Pay close attention to any stitch repeats or pattern multiples, as these can greatly impact the overall fabric of your project
- Use a highlighter or sticky note to keep track of your place on the chart, especially when working complex or multi-row patterns
- Don’t be afraid to swatch a section of the chart before committing to an entire project, as this will help you catch any mistakes or misunderstandings early on
Key Takeaways for Decoding Knitting Charts
Always start by familiarizing yourself with the specific abbreviations and symbols used in your knitting chart, as these can vary between patterns and designers
Break down the chart into smaller sections or rows to make it more manageable, and work through each one step by step, referencing your abbreviations and symbols guide as needed
Practice, practice, practice – the more you work with knitting charts, the more comfortable you’ll become with deciphering them, so don’t be discouraged if it takes a little time to get the hang of it
The Key to Unlocking Knitting Charts
As you learn to read a knitting chart, remember that it’s not just about deciphering symbols, but about uncovering a map that guides your needles to create something truly beautiful, one stitch at a time.
Beatrice "Bea" Quinn
Conclusion: You're Now a Knitting Chart Pro!
As we’ve journeyed through the world of knitting charts together, I hope you’ve gained a deep understanding of how to decode these intricate diagrams. We’ve covered the essential steps, from understanding knitting abbreviations to recognizing the various symbols that bring your pattern to life. By following these simple, yet powerful steps, you’ll be able to tackle even the most complex knitting projects with confidence. Remember, practice makes perfect, so don’t be afraid to try your hand at reading different types of knitting charts to reinforce your new skills.
As you continue on your knitting journey, I want to leave you with a final thought: the joy of making is in the process, not just the product. Don’t be too hard on yourself if you encounter setbacks or make mistakes – they’re an inevitable part of the learning process. Instead, focus on the sense of accomplishment that comes with creating something beautiful with your own two hands. With patience, persistence, and a willingness to learn, you’ll be well on your way to becoming a skilled knitter, and I’m honored to have been a part of your journey.
Frequently Asked Questions
What if the knitting chart has multiple sections or panels – how do I know which one to start with?
Don’t worry, it’s easy to navigate multiple sections. Look for a key or legend that indicates which panel to start with, often marked as ‘begin’ or ‘start here.’ If not, check the pattern’s introduction for clues, and always follow the sequence of panels from left to right and top to bottom.
How can I ensure I'm reading the knitting chart from the correct direction, especially if it's a complex pattern?
To ensure you’re reading the chart from the correct direction, look for the row numbers or stitch counts, usually found along the edges or in the corner of the chart. These will guide you to start from the foundation of the project, and I always recommend highlighting or circling them for clarity.
What if I encounter an unfamiliar symbol or abbreviation in the knitting chart – are there any resources or references I can use to look it up?
Don’t worry, it’s easy to get stuck on an unfamiliar symbol. If you encounter one, simply refer to the key or legend provided with your knitting pattern. You can also check a reliable knitting resource, such as a trusted website or knitting book, for a comprehensive guide to symbols and abbreviations.