I still remember the day I discovered the joy of macrame – it was like unlocking a secret world of creative possibilities. I was in art school, experimenting with different materials and techniques, when I stumbled upon a guide to macrame that changed everything. At first, I thought it was just about knots and patterns, but as I delved deeper, I realized it was so much more than that – it was a way to add a personal touch to my space, to tell a story through every carefully crafted piece. That’s why I’m excited to share my own a guide to macrame with you, to help you unlock the magic of this ancient craft and bring a touch of handmade beauty into your life.
As you dive into this a guide to macrame, you can expect to get practical advice and honest tips on how to get started with macrame, from the basic knots to more complex patterns. I’ll share my favorite techniques, the ones that have helped me build a successful Etsy shop and create pieces that bring joy to my customers. My goal is to empower you to create something truly unique, to experiment with different materials and styles, and to make macrame your own. So, let’s get started on this creative journey together, and see where the threads take us!
Table of Contents
Guide Overview: What You'll Need
Total Time: 2 hours 30 minutes
Estimated Cost: $20 – $50
Difficulty Level: Intermediate
Tools Required
- Scissors (sharp and dedicated to cutting cord or yarn)
- Board or other stable surface (for knotting and cord management)
- Tape measure (for measuring cord or yarn lengths)
- Pencil or marker (for marking patterns or designs)
Supplies & Materials
- Cotton rope or macrame cord (available in various diameters and colors)
- Wood or metal dowel (for creating knots and patterns)
- Beads or other decorative items (optional for added design elements)
- Plant pot or other object (for practicing macrame techniques and creating a finished product)
Step-by-Step Instructions
- 1. First, let’s start with the basics – gathering our materials. You’ll need some macrame cord, a few wooden dowels or rings, and a pair of scissors. I like to use a variety of cord colors and textures to add some visual interest to my projects, so don’t be afraid to get creative and experiment with different combinations.
- 2. Next, we’ll need to cut our cord to the right length. This will depend on the specific project you’re working on, but a good rule of thumb is to cut a piece of cord that’s about 3-4 times the length of the finished piece. For example, if you’re making a plant hanger, you’ll want to cut a piece of cord that’s at least 6-8 feet long.
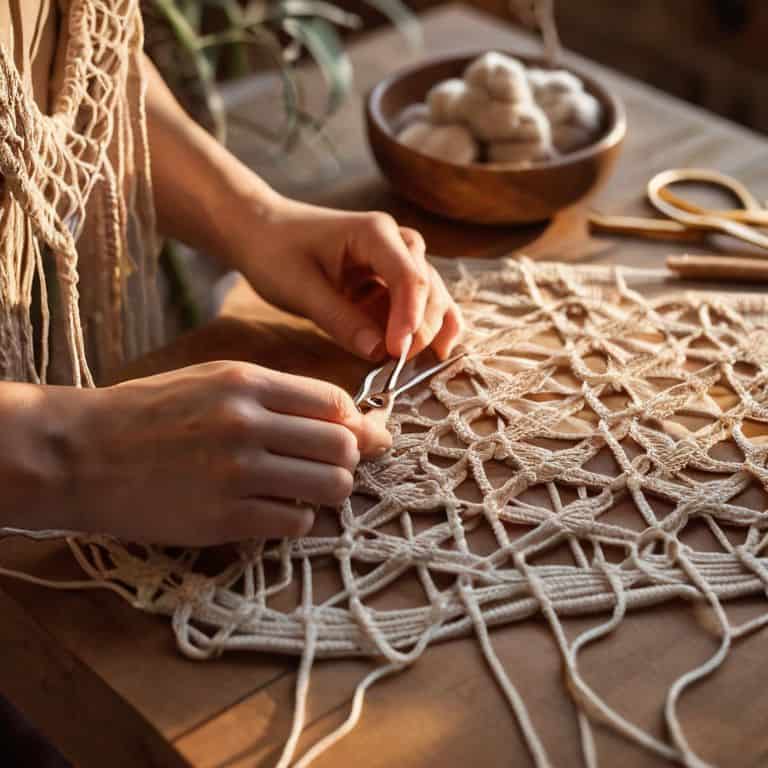
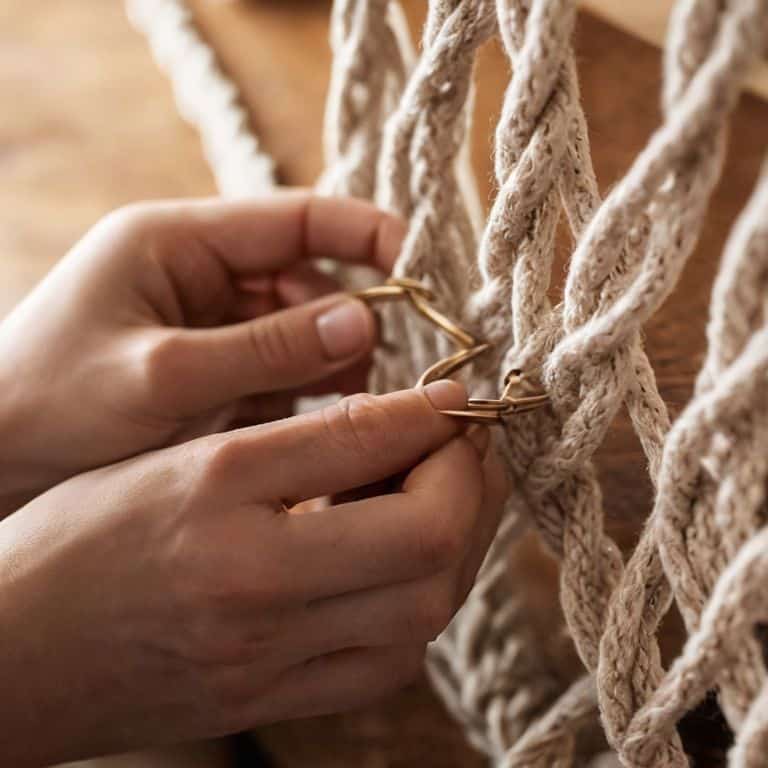
- 3. Now it’s time to start creating our knots. Macrame is all about knots, and there are a few basic ones you’ll need to know to get started. The first one is the lark’s head knot, which is used to attach the cord to the dowel or ring. To make a lark’s head knot, simply fold the cord in half and pass the folded end over the dowel, then bring the ends back under and through the loop.
- 4. Once you’ve got your lark’s head knot in place, you can start adding some decorative knots. One of my favorites is the wrapped knot, which involves wrapping the cord around the dowel a few times, then passing the ends through the center of the wraps. This creates a beautiful, textured look that adds some real visual interest to your project.
- 5. As you continue to work on your project, you’ll need to add some stabilization to keep everything in place. This is where the wooden dowels or rings come in – they provide a solid base for your knots and help keep everything looking neat and tidy. Simply pass the cord over the dowel, then bring it back under and through the loop to create a secure attachment.
- 6. Now we’re going to start adding some pattern and texture to our project. This is where the magic happens, and you can really start to see your macrame piece come to life. One way to do this is by using a variety of knotting patterns – for example, you might use a series of wrapped knots, followed by a few lark’s head knots, to create a unique and interesting texture.
- 7. Finally, it’s time to finish off our project and add any final details. This might involve trimming the ends of the cord, adding a few decorative beads or shells, or simply fluffing out the knots to create a more textured look. Whatever you choose, make sure it’s something that reflects your personal style and adds to the overall aesthetic of your macrame piece.
Unleash Macrame Magic
As I delve deeper into the world of macrame, I’m always excited to experiment with new textures and patterns. One of my favorite ways to add some visual interest to a piece is by using different types of macrame cords. From cotton rope to hemp, each material has its own unique characteristics that can elevate your design. For instance, if you’re making a macrame plant hanger, you might want to use a sturdy cotton rope to support the weight of the plant.
When it comes to creating beautiful wall decor, I’m a big fan of keeping things beginner friendly. That’s why I love using simple patterns like the classic knot or the twist knot. These patterns are not only easy to learn, but they also create a stunning visual effect that’s perfect for a DIY macrame wall hanging. Plus, you can always add your own personal touch by incorporating different colors or textures into your design.
To take your macrame skills to the next level, I recommend checking out some macrame knot tutorials online. These tutorials can provide you with a wealth of knowledge and inspiration, from learning new knots to creating intricate designs. And who knows, you might just discover a new passion for macrame jewelry making or creating your own unique plant hangers. The possibilities are endless, and I’m excited to see what you create!
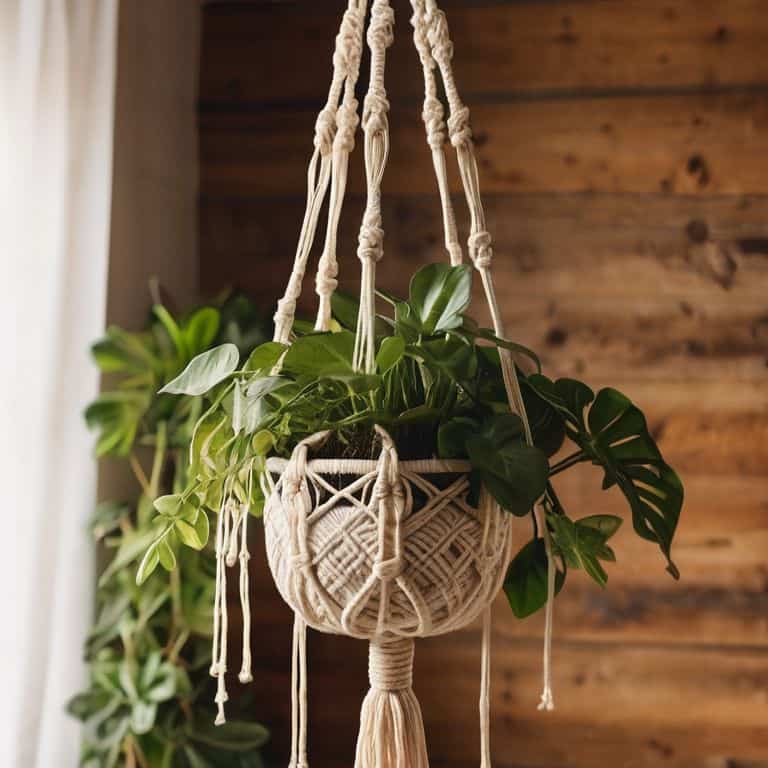
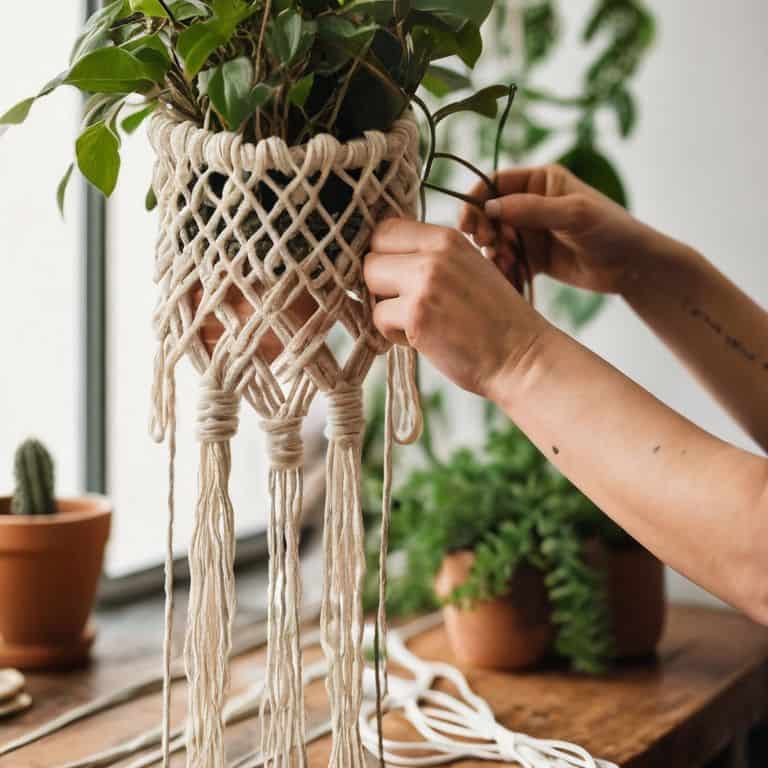
Macrame Plant Hangers for Beginners
Macrame plant hangers are one of my favorite projects for beginners – they’re a great way to get started with macrame and add a bohemian touch to your space. I just love how a few simple knots can turn a plain plant into a stunning piece of home decor. To get started, you’ll need some cotton rope, a few basic knots, and a plant that’s ready to shine. Don’t worry if your first attempts are a little wonky – it’s all part of the charm!
I’ve found that the key to creating beautiful macrame plant hangers is to experiment and have fun with different patterns and textures. You can add beads, shells, or other embellishments to give your hanger a personal touch. And the best part? You can customize the length and style to fit your unique space and plants.
Mastering Types of Macrame Cords
Now that we’ve dipped our toes into the wonderful world of macrame plant hangers, let’s talk about the magic that happens with different types of cords. I just love experimenting with various textures and materials – it’s amazing how it can completely transform a piece. From the soft, cotton ropes to the more rustic, jute cords, each one brings its own unique character to the table. And don’t even get me started on the colorful options – I mean, who says macrame has to be boring?
I’ve had so much fun playing around with cord combinations, and I highly recommend you do the same. Try mixing and matching different materials, thicknesses, and hues to create something truly one-of-a-kind. Trust me, it’s a game-changer. Whether you’re making a bohemian-inspired wall hanging or a delicate plant hanger, the right cord can make all the difference. So go ahead, get creative, and see what kind of macrame magic you can unleash with these incredible cords!
Weaving Wisdom: 5 Essential Tips for Mastering Macrame
- Start with the basics: invest in a few good quality macrame cords and a reliable board to pin your work, trust me, it makes all the difference!
- Don’t be too hard on yourself, macrame is all about embracing the imperfect – those tiny mistakes will add character to your piece, I promise!
- Experiment with different types of knots, from the simple Wrap Knot to the more intricate Spiral Knot, and find what works best for you and your project
- Play with textures and colors, mix and match various yarns, cords, and materials to create unique and eye-catching pieces that reflect your personality
- Practice, practice, practice – the more you macrame, the more comfortable you’ll become with the knots and patterns, and the more your own style will start to shine through, so don’t be afraid to try new things and make mistakes!
Three Key Takeaways to Get You Started with Macrame
Experiment with different types of macrame cords and materials to add unique textures and personalities to your projects
Don’t be afraid to add your own twist and creativity to traditional macrame patterns – it’s all about making it your own and having fun with the process
With practice and patience, you can create stunning macrame pieces, from plant hangers to wall hangings, that reflect your personal style and add a touch of handmade magic to your home
Weaving Words of Wisdom
Macrame is more than just knots and cords – it’s a journey of self-expression, a dance of fingers and yarn, and a celebration of the imperfectly perfect.
Ruby Warren
Embracing the Macrame Journey
As we conclude this guide to macrame, I hope you’ve enjoyed the journey of discovering the basics of knots and patterns, and how to apply them to create beautiful pieces like macrame plant hangers. We’ve covered the essential steps to get you started, from understanding the different types of macrame cords to mastering the techniques for creating stunning plant hangers. Remember, the key to unleashing your creativity is to practice, experiment, and have fun with the process. Don’t be afraid to try new things and make mistakes – they’re an essential part of the learning process.
As you continue on your macrame path, I encourage you to think outside the box and push the boundaries of what’s possible with this ancient craft. Whether you’re making something for yourself or as a gift for a loved one, remember that the true value of a handmade item lies in the love and effort you put into it. So, keep creating, keep inspiring, and most importantly, keep enjoying the journey – one knot at a time.
Frequently Asked Questions
What are some essential tools and materials I need to get started with macrame?
Oh, sweetheart, let’s get started! You’ll need some basic tools like a cord cutter, board, and a few rings or dowels. For materials, choose your favorite macrame cord – I adore cotton rope or yarn – and pick some complementary beads or shells to add some personality to your piece. Happy crafting!
How do I choose the right type of cord or yarn for my macrame project?
Choosing the right cord or yarn is all about vibe and function! Consider the project’s purpose, the space it’ll inhabit, and the look you’re going for. I love experimenting with different textures and colors – cotton rope for a boho feel, or sleek nylon for a modern twist. What’s the style you’re aiming for, and I can give you more tailored advice?
What are some common mistakes to avoid when creating macrame patterns and knots?
Oh friend, let’s talk macrame mishaps! Common mistakes to avoid include uneven tension, incorrect knot placement, and not leaving enough cord length for finishing touches. Don’t worry, we’ve all been there – even I have a yarn stash full of “experiments” gone wrong!