I still remember the day my wife, an avid weaver, came to me frustrated with her yarn organization. She needed a reliable way to manage her skeins, and I knew I had to find a solution. That’s when I discovered the world of yarn swifts, and I was determined to learn how to build a yarn swift from pvc pipe. As a carpenter, I was excited to combine my woodworking skills with my wife’s fiber arts passion. I started experimenting with different materials, but PVC pipe stood out for its durability and versatility. I was surprised by how easy it was to work with and how functional the end result could be.
In this article, I’ll share my personal experience and guide you through the process of building a yarn swift from PVC pipe. You’ll get honest, no-hype advice on how to create a functional and beautiful tool that will make your fiber arts projects easier to manage. I’ll walk you through the steps, from cutting and assembling the PVC pipe to adding the finishing touches. By the end of this guide, you’ll have a sturdy yarn swift that will hold your skeins with ease, and you’ll be able to enjoy your fiber arts projects without the hassle of tangled yarn. Whether you’re a seasoned crafter or just starting out, this DIY project is perfect for anyone looking to build a reliable yarn swift and take their crafting to the next level.
Table of Contents
Guide Overview: What You'll Need
Total Time: 1 hour 30 minutes
Estimated Cost: $20 – $40
Difficulty Level: Easy
Tools Required
- PVC pipe cutter (or a saw for cutting PVC pipe)
- Drill (with 1/8 inch drill bit)
- Sandpaper (for smoothing cut edges)
- Wrench or pliers (for tightening PVC pipe fittings)
Supplies & Materials
- 1 inch PVC pipe (10 feet long)
- 1 inch PVC elbow fittings (4 pieces)
- 1 inch PVC T-fittings (2 pieces)
- 1 inch PVC end caps (2 pieces)
- Wood screws (for attaching swift to a base)
- Wood board (12 inches x 12 inches, for base)
Step-by-Step Instructions
- 1. To start building our yarn swift, we need to gather our materials. This includes PVC pipes in various lengths, PVC elbows, PVC tees, a PVC pipe cutter, a drill press, and some sandpaper. I like to think that the right tools and materials are just as important as the yarn we’re working with, so take your time and make sure you have everything you need.
- 2. Next, let’s _plan out our design_. We’re aiming for a swift that can hold a decent amount of yarn, so we’ll need to decide on the size and configuration of our PVC pipes. I find it helpful to sketch out a few different ideas before settling on one. Consider the space where you’ll be using the swift and how much yarn you typically work with.
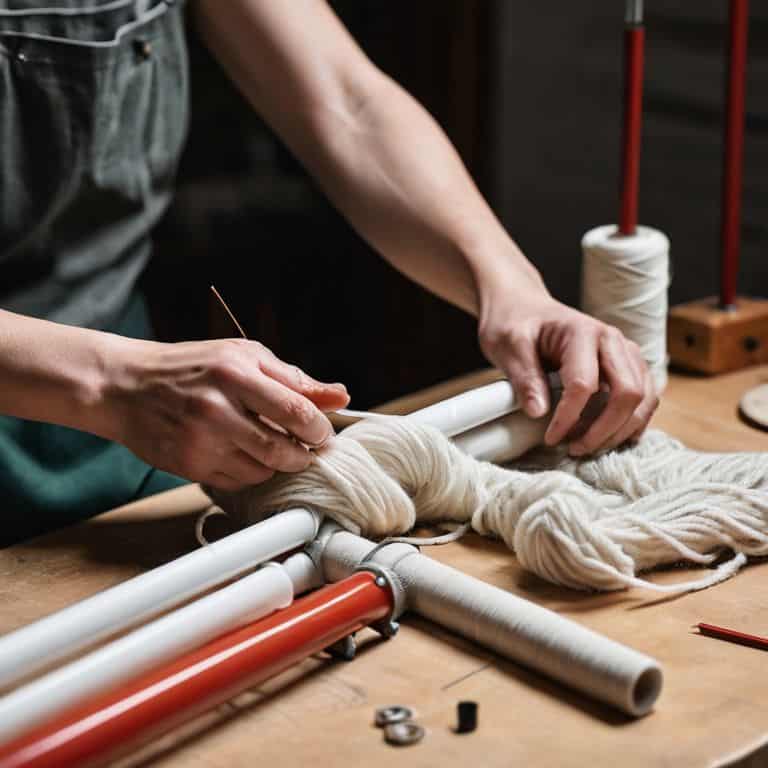
- 3. Now it’s time to cut our PVC pipes. Using our PVC pipe cutter, we’ll cut the pipes into the lengths we need according to our design. Make sure to wear some protective gloves and safety glasses, as the cutting process can get a bit messy. I’ve found that a good pair of gloves can make all the difference in keeping you safe and comfortable while working with power tools.
- 4. With our pipes cut, we can start _assembling the swift_. We’ll use our PVC elbows and tees to connect the pipes, forming the base and arms of the swift. It’s a bit like building with Lego, except instead of blocks, we’re using pipes and fittings. Take your time and make sure each connection is secure before moving on to the next step.
- 5. Once we have the basic structure of the swift together, we can start adding the details. This includes drilling holes for the yarn to pass through and sanding down any rough edges. I like to use a drill press for this step, as it gives me more control and precision. Remember to sand in a well-ventilated area, and consider wearing a mask to avoid inhaling any dust.
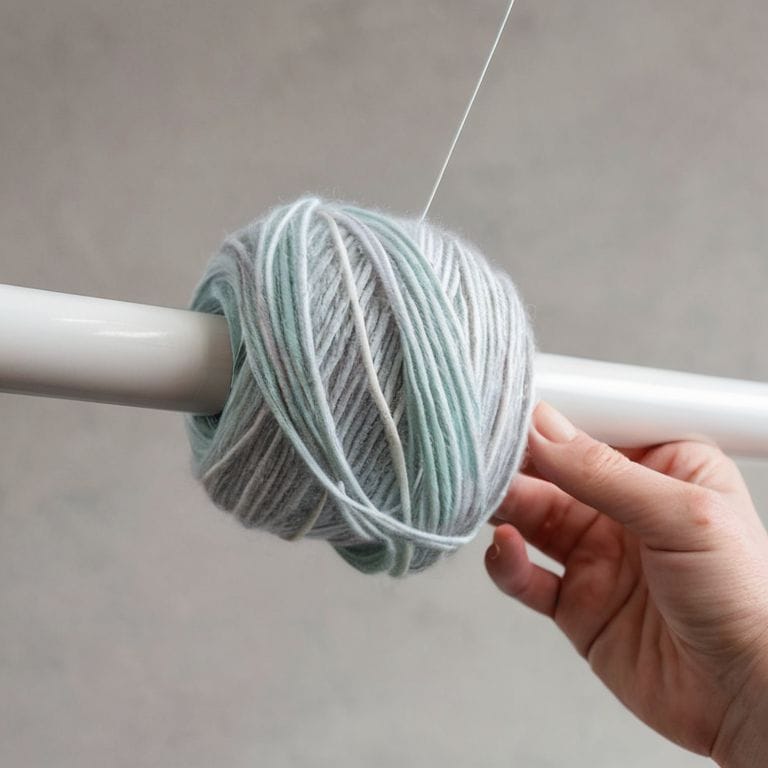
- 6. Next, we’ll _attach the yarn guide_. This is the part of the swift that will help us manage the yarn as we wind it on or off. We can use a small piece of PVC pipe or even a wooden dowel for this. The key is to make sure it’s securely attached and can rotate smoothly. I’ve found that a little bit of _trial and error_ can go a long way in getting this part just right.
- 7. Finally, let’s test our swift. Wind some yarn onto it and see how it performs. Make any necessary adjustments to the tension or the yarn guide. This is also a good time to _add any finishing touches_, such as a coat of paint or varnish to protect the PVC pipes. With a little patience and practice, you should be able to create a yarn swift that will make your fiber arts projects a whole lot easier.
Sawdust Meets Skeins

As I worked on this PVC pipe yarn swift project, I couldn’t help but think about the importance of yarn organization in my wife’s crafting space. A well-organized workspace can make all the difference in the quality and efficiency of her fiber arts projects. That’s why I also like to explore other pvc pipe crafting ideas, such as storage solutions for yarn, threads, and other supplies. By utilizing PVC pipes in various creative ways, we can keep her workspace tidy and functional.
When it comes to working with yarn, it’s not just about the swift – it’s also about the yarn storage solutions we use. I’ve found that a homemade yarn ball winder can be a game-changer for managing yarn skeins. By combining a yarn swift with a winder, my wife can easily unwind and rewind yarns, keeping them organized and preventing tangles. This setup has been a huge time-saver and has allowed her to focus on the creative aspects of her craft.
In addition to the yarn swift, I’ve also experimented with other pvc pipe projects for crafters, such as thread organizers and supply holders. These small projects have not only helped to keep her workspace organized but have also inspired new ideas for DIY yarn ball winder designs and other crafting tools. By embracing the DIY spirit and exploring different materials and techniques, we can create a more efficient, enjoyable, and personalized crafting experience.
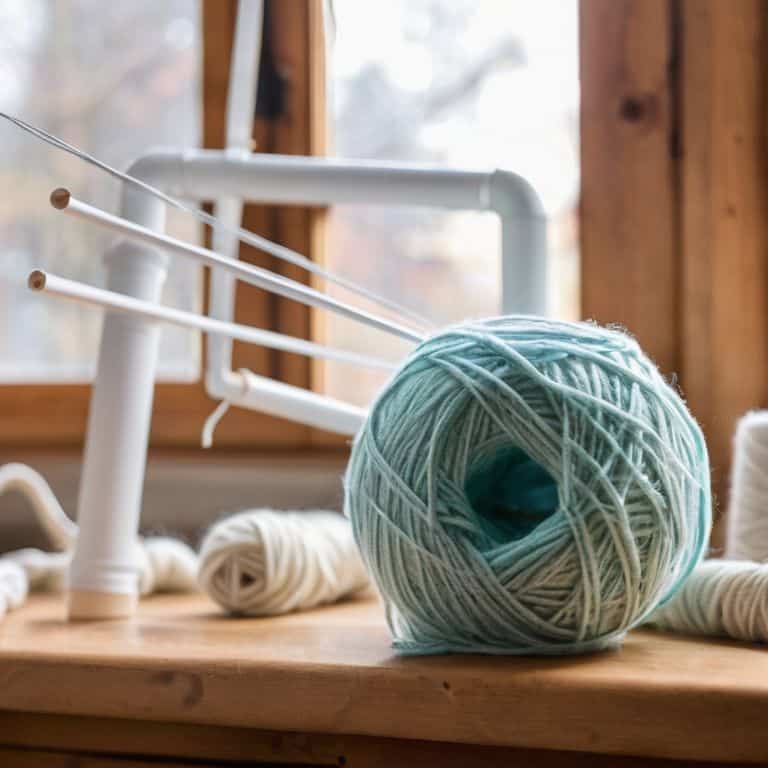
How to Build a Yarn Swift From Pvc Pipe
As I began working with PVC pipe, I realized its potential for creating functional tools for my wife’s fiber arts projects. The yarn swift, in particular, caught my attention – a simple, yet clever device that could streamline her workflow. I started experimenting with different PVC pipe configurations, testing various joint connections and pipe lengths to find the perfect balance between stability and adjustability. The result was a sturdy, easy-to-use yarn swift that my wife loved.
With some basic tools and a few clever cuts, you can create your own PVC pipe yarn swift. I’ll walk you through the process, sharing my own trial-and-error experiences and the tips I’ve learned along the way. From measuring and cutting the pipes to assembling the swift, I’ll provide you with a clear, step-by-step guide to help you bring this project to life.
Pvc Pipe Crafting Ideas for Yarn Lovers
As I delve deeper into the world of PVC pipe crafting, I’m excited to share more ideas that combine my love of woodworking with my wife’s passion for fiber arts. One project that’s on my radar is creating a custom yarn ball winder using PVC pipes and a few cleverly designed wooden components. I envision a sturdy, compact design that can sit neatly on a crafting table, making it easy to manage yarns of all sizes.
I’m also toying with the idea of crafting a PVC pipe yarn drying rack, perfect for air-drying freshly hand-washed yarns or fibers. With a little creativity, I believe PVC pipes can become an essential material for yarn enthusiasts, offering a durable and versatile solution for organizing and managing their crafting space.
5 Essential Tips for Crafting a PVC Pipe Yarn Swift
- Choose the Right PVC Pipe Size: Don’t be afraid to experiment with different diameters to find the perfect fit for your yarn swift – I found that 1/2 inch and 1 inch pipes work great for most projects
- Deburr Those Edges: A quick sanding or filing of the cut edges will save you from scratched hands and ensure a smooth yarn-winding experience
- Get Creative with Joint Connections: Instead of using traditional PVC elbow joints, try 3D printing custom connectors or using wooden dowels for a more rustic look
- Add Some Grip to Your Swift: Wrapping a bit of leather or cork tape around the pipe can provide extra traction when winding yarn, making the process a whole lot easier
- Keep it Adjustable: Incorporate a simple mechanism, like a sliding collar or a removable segment, to allow for easy adjustments to your yarn swift’s circumference – trust me, it’s a game-changer for working with different yarn types
Key Takeaways: Building a Yarn Swift from PVC Pipe
By repurposing PVC pipe, you can create a functional and durable yarn swift that simplifies your fiber arts projects, making it easier to manage yarn and reduce tangles.
With basic DIY skills and a few simple tools, you can build a custom yarn swift tailored to your specific needs, whether you’re a beginner or an experienced crafter.
Combining woodworking and fiber arts techniques opens up a world of creative possibilities, allowing you to craft unique, handmade tools and accessories that enhance your crafting experience and add a personal touch to your projects.
Wrapping Up Your DIY Yarn Swift Project
As we wrap up this DIY journey, let’s take a moment to appreciate the versatility of PVC pipe in our crafting endeavors. From the initial introduction to the final steps, we’ve explored how to transform this humble material into a functional yarn swift. We’ve covered the main steps, from cutting and assembling the pipe to adding the necessary components for a smooth yarn-winding experience. The ‘Sawdust Meets Skeins’ section highlighted the intersection of woodworking and fiber arts, showcasing how our PVC pipe project fits into the broader world of handmade crafts. By following these steps and embracing your creativity, you’ve not only created a useful tool but also become part of a community that values handmade functionality.
With your new yarn swift in hand, remember that the true beauty of DIY projects lies not just in their usefulness, but in the story behind each handmade piece. As you continue to explore the world of woodworking and fiber arts, keep in mind that every project is an opportunity to learn and grow. Whether you’re a seasoned maker or just starting out, the process of creating something from scratch is a journey worth embracing. So, go ahead, get creative, and make something that tells your story. The world of DIY is full of endless possibilities, and with the skills you’ve gained from this project, you’re ready to take on the next challenge that comes your way.
Frequently Asked Questions
What type of PVC pipe is best suited for building a yarn swift, and are there any specific sizes or schedules that work better than others?
For a yarn swift, I recommend using Schedule 40 PVC pipe – it’s sturdy and affordable. Look for 1/2″ or 3/4″ diameter pipes, as they provide a great balance between stability and portability. I’ve found that 10′ lengths work perfectly for most swifts, giving you enough material to create a robust and functional design.
How do I ensure that my yarn swift is stable and won't topple over when it's loaded with yarn, and are there any tips for anchoring it to a table or floor?
To keep your yarn swift stable, I recommend adding weight to the base or using anti-slip mats. For anchoring, try clamping it to a table or attaching it to a wooden board that can be screwed to the floor. This will give you a solid foundation for winding yarn without any wobbles.
Can I customize my PVC pipe yarn swift with different features, such as adjustable arms or a built-in yarn cutter, and if so, what are some creative ways to do so?
Absolutely, get creative with it. I’ve added adjustable arms to mine using metal hinges and a yarn cutter with a retractable blade – my wife loves the extra functionality. You can also try adding a built-in yarn ball winder or a measuring gauge, the possibilities are endless, just remember to keep it sturdy and practical.