As I stand in my studio, surrounded by half-finished woven pieces and spools of yarn, I’m reminded of the often-overlooked foundation of a beautiful wall hanging: the dowel. I’ve seen many a stunning tapestry fall short of its full potential due to a poorly chosen dowel. This is why I’m excited to share with you a guide to choosing a dowel for your wall hanging, a crucial step in bringing your woven masterpiece to life. It’s a decision that can make or break the overall aesthetic of your piece, and one that I’ve given considerable thought to in my own practice as a textile artist.
In this article, I promise to cut through the noise and offer you practical advice on selecting the perfect dowel for your wall hanging. I’ll share my own experiences, from the mistakes I’ve made to the triumphs I’ve achieved, in the hopes of guiding you towards creating a truly exceptional piece of woven art. Whether you’re a seasoned weaver or just starting out, my goal is to empower you with the knowledge to make informed decisions about your dowel choice, and to help you understand why it’s so crucial to the overall success of your wall hanging. By the end of this guide, you’ll be equipped with the confidence to choose a dowel that will elevate your woven piece to new heights.
Table of Contents
- Guide Overview: What You'll Need
- Step-by-Step Instructions
- A Guide to Choosing a Dowel for Your Wall Hanging
- Elevating Your Wall Hanging: 5 Essential Tips for Choosing the Perfect Dowel
- Key Takeaways for Choosing the Perfect Dowel
- The Heart of the Matter
- Weaving a Perfect Finish
- Frequently Asked Questions
Guide Overview: What You'll Need
Total Time: 30 minutes to 1 hour
Estimated Cost: $5 – $20
Difficulty Level: Easy
Tools Required
- Tape Measure (for measuring wall space)
- Level (for ensuring straight hanging)
- Drill (for making pilot holes)
- Pencil (for marking wall and dowel position)
Supplies & Materials
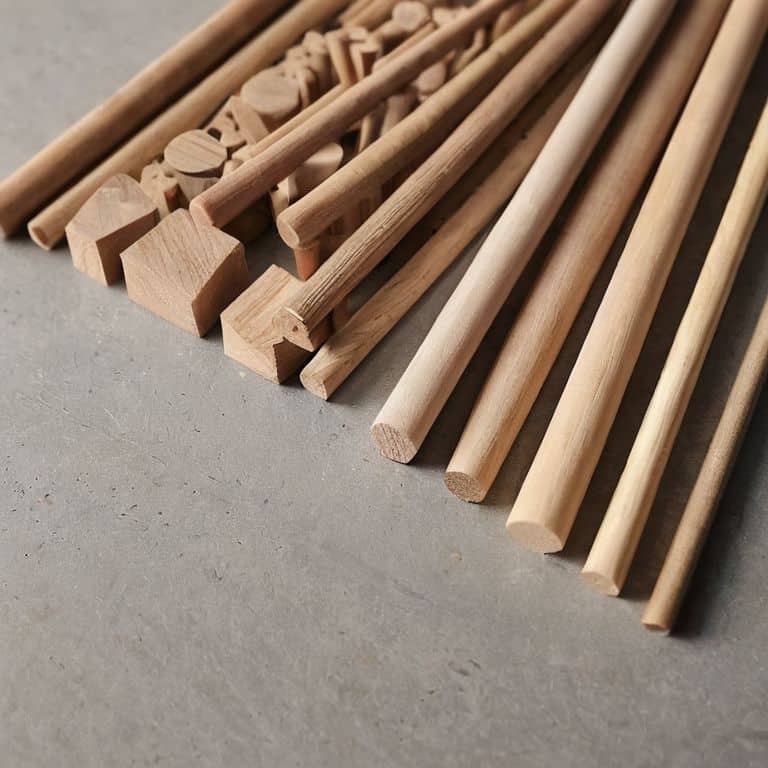
- Dowel Rods available in various diameters and lengths, typically 1/4 inch, 1/2 inch, or 1 inch in diameter and 36 inches or 48 inches in length
- Wall Anchors such as plastic or metal anchors for hanging
- Screws for securing dowel to wall anchor
- Wood Glue (optional, for reinforcing dowel joints)
Step-by-Step Instructions
- 1. First, consider the overall aesthetic you want to achieve with your wall hanging, as this will help guide your dowel selection. Think about the color, texture, and style of your woven piece, as well as the space where it will be displayed. I like to sketch out a few ideas on graph paper to get a sense of the overall design.
- 2. Next, measure the width of your woven piece to determine the minimum length of dowel you’ll need. You’ll want to choose a dowel that’s slightly longer than the width of your piece, to allow for easy hanging and to prevent the dowel from being visible from the sides. I always double-check my measurements to ensure a precise fit.
- 3. Choose a dowel material that complements your woven piece. I often opt for natural materials like wood or bamboo, as they add a touch of organic elegance to the overall design. Consider the color and texture of the dowel, as well as its durability and weight capacity.
- 4. Consider the diameter of the dowel, as this will affect the overall visual balance of your wall hanging. A thicker dowel can create a bold, statement-making look, while a thinner dowel can provide a more subtle support. I like to experiment with different diameters to find the perfect balance for my piece.
- 5. Think about the type of hanging hardware you’ll need to attach the dowel to the wall. You may need to choose between screws, nails, or adhesive strips, depending on the type of wall and the weight of your woven piece. I always plan ahead and choose hardware that’s sturdy and reliable.
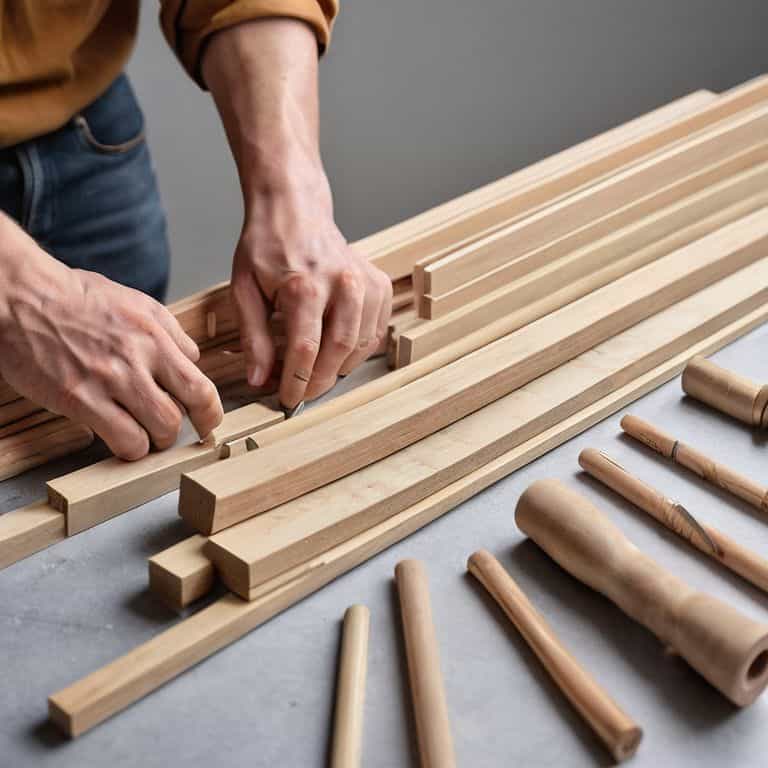
- 6. Cut the dowel to the desired length using a saw or a craft knife. If you’re using a wooden dowel, you may want to sand the cut ends to create a smooth finish. I like to take my time with this step, as a smooth finish can make all the difference in the overall appearance of your wall hanging.
- 7. Assemble the hanging hardware and attach the dowel to the back of your woven piece. Make sure the dowel is securely attached and the hardware is evenly spaced to prevent the piece from becoming off-balance. I always take a step back to admire my work and make any necessary adjustments before hanging the piece on the wall.
- 8. Finally, hang your woven piece on the wall and step back to admire your handiwork. Take note of the way the dowel interacts with the surrounding space, and make any necessary adjustments to the placement or positioning of the piece. I love this moment, as it’s a chance to see my textile architecture come to life.
A Guide to Choosing a Dowel for Your Wall Hanging
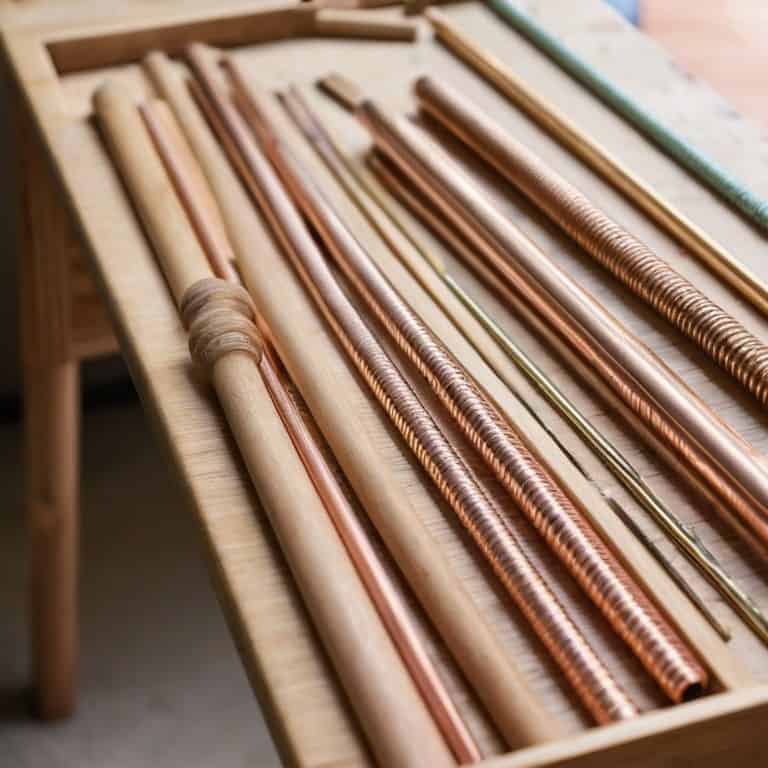
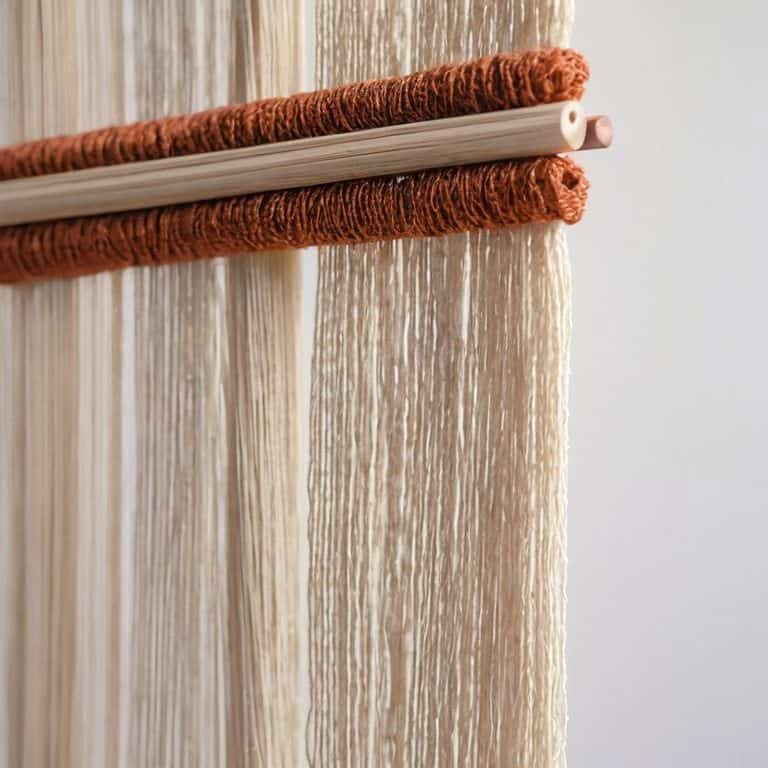
As I delve into the world of dowels for wall hangings, I’m reminded of the importance of dowel material selection. The type of material used can greatly impact the overall aesthetic and durability of the piece. For instance, a copper dowel can add a touch of warmth and sophistication, while a brass dowel can provide a more modern and sleek look. When it comes to durability, it’s essential to consider the hanging weight limits for the dowel, ensuring that it can support the weight of the woven piece.
When selecting a dowel, it’s also crucial to consider the finishing techniques for exposed dowels. A well-finished dowel can elevate the entire piece, while a poorly finished one can detract from its beauty. I often opt for a simple, natural finish, allowing the beauty of the wood to shine through. In terms of sizing, referencing a dowel size chart can be helpful, especially when working with heavy frames.
In my experience, the key to choosing the perfect dowel lies in finding a balance between form and function. By considering factors such as types of dowels for wall hangings and dowel size, you can create a piece that is not only visually stunning but also sturdy and long-lasting. Whether you’re working with a heavy frame or a delicate woven piece, the right dowel can make all the difference in bringing your masterpiece to life.
Exposing Beauty Finishing Techniques for Copper Dowels
When working with copper dowels, I love how the natural patina can add a touch of warmth to my woven pieces. To expose this beauty, I recommend gently polishing the dowel with a soft cloth to remove any oxidation. This subtle shine enhances the overall texture and visual interest of the wall hanging. For a more rustic look, you can also leave the copper to naturally weather, allowing it to develop a unique character over time.
By carefully considering the finish of your copper dowel, you can elevate your woven art from a simple textile piece to a thoughtfully designed installation. Whether you choose a polished or weathered look, the copper dowel will add a sophisticated touch to your wall hanging, inviting the viewer to appreciate the intricate details and textures of your handmade craft.
The Skeletal Frame Dowel Size and Material
When it comes to the skeletal frame of your wall hanging, the dowel size and material are crucial. I like to think of the dowel as the foundation of my woven piece – it provides the structure and support for the entire work. For smaller pieces, a slender dowel with a diameter of about 1/4 inch is often sufficient, while larger works require a sturdier option, perhaps 1/2 inch or more. As for materials, I’m particularly fond of working with wooden dowels, especially those made from sustainably sourced hardwoods like oak or maple. The natural texture and grain of the wood add an extra layer of depth and visual interest to the overall piece.
Elevating Your Wall Hanging: 5 Essential Tips for Choosing the Perfect Dowel
- Consider the weight and size of your woven piece to determine the ideal dowel diameter and material
- Think beyond traditional wood – copper, bamboo, and recycled materials can add an extra layer of depth and character to your wall hanging
- Remember, the dowel is not just functional, but also a design element – choose a finish that complements the colors and textures in your woven art
- Experiment with different dowel lengths to create a sense of tension or balance in your wall hanging, and don’t be afraid to get creative with unconventional materials
- Ultimately, the dowel you choose should enhance the overall aesthetic of your woven piece, so trust your instincts and select one that feels like an extension of your art, rather than just a necessary component
Key Takeaways for Choosing the Perfect Dowel
Consider the dowel as the foundation of your woven piece, where its size and material should harmonize with the texture and form of your artwork
Finishing techniques can elevate the aesthetic of your dowel, such as exposing the natural beauty of copper through meticulous polishing or patina application
Ultimately, the choice of dowel is an integral part of the design process, requiring a thoughtful balance between sturdiness, elegance, and the overall artistic vision of your wall hanging
The Heart of the Matter
A dowel is not just a functional element, but a design statement – it’s the first line in the blueprint of your woven art, setting the tone for the entire piece and inviting the eye to explore the textures and colors that follow.
Ethan Thorne
Weaving a Perfect Finish
As we conclude this guide to choosing a dowel for your wall hanging, remember that the skeletal frame of your woven piece is just as important as the weaving itself. We’ve explored the importance of dowel size and material, and delved into the world of finishing techniques, including those for copper dowels. By considering the texture, color, and form of your dowel, you can elevate your woven art to new heights. Whether you’re a seasoned weaver or just starting out, the key is to balance functionality with aesthetics, ensuring that your dowel seamlessly integrates with your wall hanging.
As you embark on your next weaving project, I encourage you to think of the dowel not just as a practical component, but as a design element that can add depth and character to your work. By embracing this mindset, you’ll unlock a world of creative possibilities, and your woven pieces will become true reflections of your artistic vision. So go ahead, experiment with different dowel materials, sizes, and finishes, and watch your wall hangings come alive with texture and beauty.
Frequently Asked Questions
What are the most common materials used for dowels in wall hangings and how do they affect the overall aesthetic?
When it comes to dowel materials, I’ve found that wood, copper, and bamboo are the most popular choices. Wood adds a warm, organic feel, while copper brings a touch of sophistication and elegance. Bamboo, on the other hand, lends a light, airy quality to the piece. Each material uniquely influences the overall aesthetic, allowing you to tailor the look to your woven art.
How do I determine the ideal dowel size for my specific wall hanging project?
To determine the ideal dowel size, consider the weight and scale of your wall hanging. I like to think of it as finding the perfect skeleton for your woven piece. Measure the width of your hanging and choose a dowel that’s roughly one-quarter to one-third of that width, ensuring it’s sturdy enough to support the weight without overpowering the design.
Can I use a copper dowel for a wall hanging that will be exposed to outdoor elements, and if so, what precautions should I take?
While copper dowels can add a stunning touch, they may not be the best choice for outdoor exposure. Copper can oxidize and degrade when exposed to the elements, compromising the integrity of your wall hanging. If you still want to use copper, consider applying a clear sealant or wax to protect it, and regularly inspect and maintain the dowel to ensure it remains sturdy.