As I sit amidst my loom and half-finished projects, I’m reminded of the common myth that learning how to finish a weaving is a tedious, formulaic process. But the truth is, it’s where the real artistry comes in – those final threads are what elevate your piece from a mere fabric to a textile tapestry. I’ve lost count of how many times I’ve heard fellow weavers lament about the frustration of completing a project, only to have it fall flat due to a lackluster finish. It’s a shame, really, because mastering how to finish a weaving can make all the difference between a piece that’s merely functional and one that’s truly breathtaking.
So, what sets a beautifully finished weaving apart from one that’s merely adequate? It all comes down to attention to detail and a willingness to experiment. In this article, I’ll share my personal approach to how to finish a weaving, including the techniques and tricks I’ve learned through years of trial and error. From the importance of texture and form to the simple, yet often overlooked, steps that can make or break a piece, I’ll guide you through the process with practical, no-nonsense advice. Whether you’re a seasoned weaver or just starting out, my goal is to empower you with the knowledge and confidence to create truly stunning, professionally finished woven pieces that reflect your unique artistic vision.
Table of Contents
Guide Overview: What You'll Need
Total Time: 1 hour 15 minutes
Estimated Cost: $10 – $30
Difficulty Level: Intermediate
Tools Required
- Scissors (sharp and dedicated to cutting yarn)
- Yarn Needle (for weaving in ends)
- Measuring Tape (for measuring the finished piece)
- Ruler (for fringing or trimming edges)
- Iron and Ironing Board (for blocking the finished weave, optional)
Supplies & Materials
- Yarn (for finishing edges or weaving in ends)
- Fringe or Tassels (optional for decorative edges)
- Weaving Needle (for securing ends or sewing seams)
- Thread or Yarn for Sewing (for sewing seams or attaching decorative elements)
- Blocking Pins (optional, for pinning the weave during blocking, 6 inches apart)
Step-by-Step Instructions
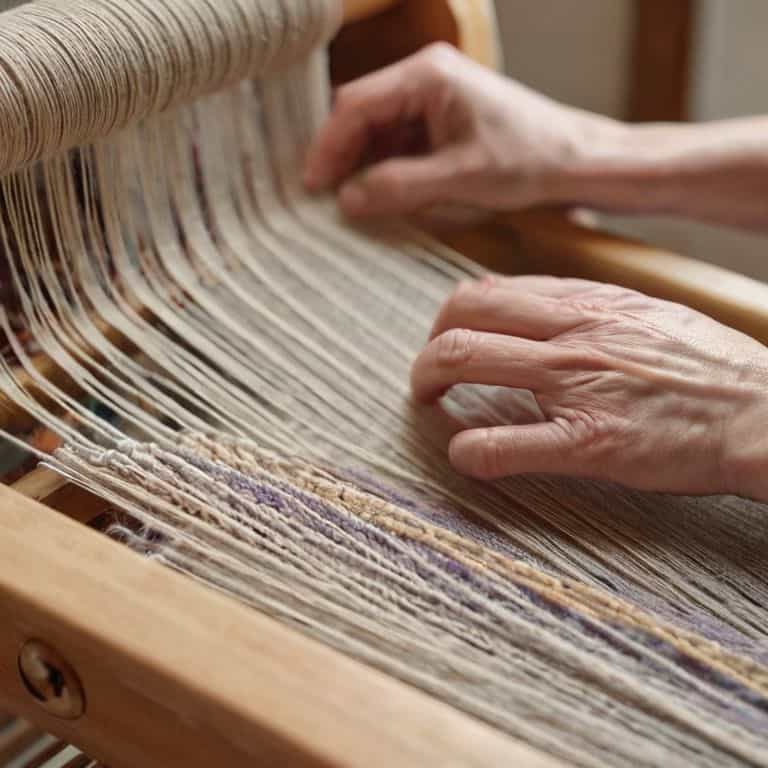
- 1. To begin the process of finishing your weaving, carefully remove it from the loom, taking note of any loose threads or ends that may need to be secured. This is a crucial step, as it sets the stage for the entire finishing process. As I always say, a strong foundation is key to a beautifully finished piece.
- 2. Next, inspect the edges of your weaving, looking for any stray threads or unevenness that may need to be trimmed or adjusted. This is also a good opportunity to evaluate the overall texture and make any necessary adjustments to ensure that it is even and consistent throughout. I find that using a sharp pair of scissors is essential for this step.
- 3. Now it’s time to secure the ends, which can be done using a variety of techniques, such as knotting, twisting, or weaving in. I prefer to use a simple overhand knot, as it is easy to execute and provides a clean finish. Be sure to pull the threads tightly to ensure that they are secure and won’t come undone over time.
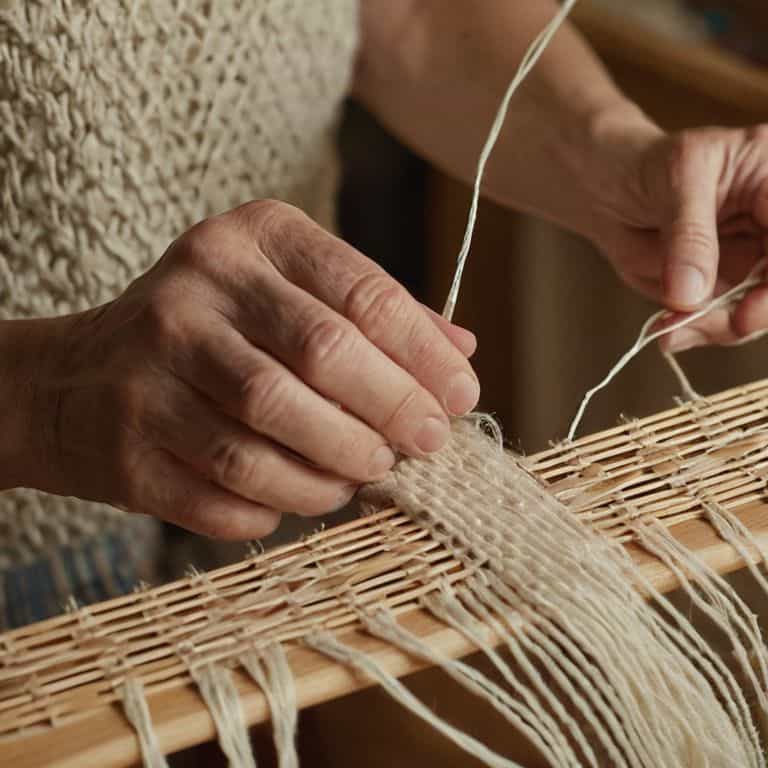
- 4. With the ends secured, you can now begin to trim the excess yarn, working carefully to avoid cutting too much or too little. It’s better to take small increments, checking your progress as you go, rather than risking cutting too much at once. I find that using a good pair of yarn scissors makes all the difference in this step.
- 5. Once the excess yarn has been trimmed, inspect the weaving again, this time looking for any loose threads or fibers that may need to be tidied up. This is also a good opportunity to fluff out the texture, using your fingers or a soft brush to tease out any tangles or matting. I like to think of this step as adding the final flourish to the piece.
- 6. Now it’s time to block the weaving, which involves wetting it, stretching it out to the desired shape, and allowing it to dry. This step is essential for evening out the texture and giving the weaving a professional finish. I recommend using a blocking board or pins to help hold the weaving in place while it dries.
- 7. Finally, once the weaving is completely dry, you can add any final embellishments, such as a hanging rod or a decorative trim. This is also a good opportunity to step back and admire your work, taking pride in the beautiful textile you’ve created. I always feel a sense of satisfaction and accomplishment when I reach this stage, knowing that I’ve brought a new piece of art into the world.
Mastering the Art of Completion
As I reflect on my journey from architecture to weaving, I realize that the attention to detail required in both fields is strikingly similar. When it comes to securing weaving edges, it’s essential to consider the overall aesthetic you want to achieve. A well-executed finish can elevate your piece from a simple woven item to a stunning work of art. I often find myself drawn to minimalist approaches, where a subtle trim or a carefully planned fringe can add a touch of sophistication.
In my experience, weaving yarn tail management is an often-overlooked aspect of the finishing process. However, it’s crucial to handle these tails with care, as they can either add to or detract from the overall texture and visual appeal of your piece. By incorporating techniques such as weaving in ends or using a yarn needle to secure loose threads, you can create a polished finish that showcases your skill and attention to detail.
For those just starting out with hand weaving, I recommend exploring various weaving finishing techniques to find what works best for you. Whether you’re adding decorative trim or opting for a more understated approach, the key is to remain intentional and true to your artistic vision. By doing so, you’ll not only master the art of completion but also develop a unique voice in the world of weaving.
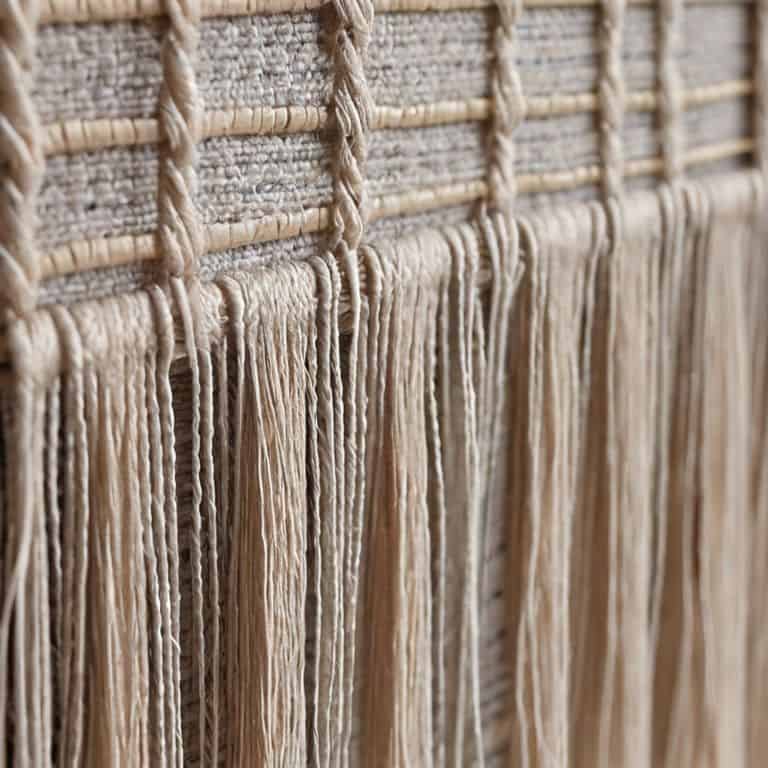
Adding Decorative Trim With Flair
As I add the final flourishes to my woven piece, I think of it as the equivalent of adding a delicate cornice to a building – it’s the crowning touch that elevates the entire structure. For me, decorative trim is not just about hiding raw edges, but about creating a visual frame that enhances the beauty of the weave. I love experimenting with different materials, from delicate silk ribbons to rustic woolen yarns, to find the perfect complement to my piece.
With a steady hand and a discerning eye, I carefully wrap, tie, or sew my chosen trim into place, making sure it’s snug but not too tight, allowing the weave to breathe and the trim to add its own subtle texture to the overall design. It’s a moment of pure joy, seeing my woven art come alive with this final, flourish of creativity.
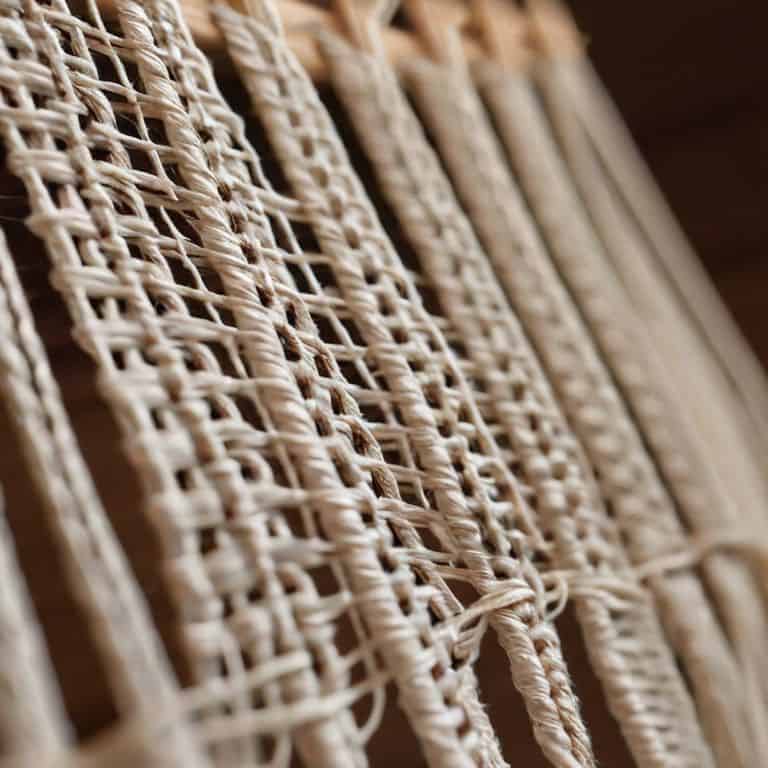
Securing Edges With Precision
As I secure the edges of my latest weaving, I’m reminded of the precision required in architectural details. A single misstep can disrupt the entire composition. To achieve a polished finish, I carefully trim the excess yarn, making sure to leave a small tail for weaving in. This attentiveness is akin to adding the final touches to a building’s facade – it’s where the craftsmanship truly shines. With a pair of sharp scissors and a steady hand, I tidy up the edges, creating a seamless transition between the woven piece and the surrounding space.
By doing so, I’m not only preventing fraying but also creating a sense of continuity, much like the deliberate lines and curves in a well-designed structure. This meticulous approach may seem minor, but it’s a testament to the devotion required to bring a weaving project to life.
The Final Flourishes: 5 Essential Tips to Complete Your Weaving
- Let the edges breathe: resist the temptation to over-weave or over-tighten, as this can lead to a stiff and lifeless piece
- Choose your trim wisely: the right decorative edge can elevate your weaving from beautiful to breathtaking, so select materials that complement your palette and texture
- Balance is key: step back from your loom and evaluate the overall composition of your piece, making adjustments as needed to ensure a harmonious blend of color and form
- Don’t forget the finishing touches: a simple yet elegant fringe or a carefully crafted hanging system can make all the difference in showcasing your finished weaving
- Weave with intention: as you work on those final threads, remember that every stitch is an opportunity to imbue your piece with meaning, texture, and beauty, so take your time and savor the process
Key Takeaways for a Polished Finish
As you near the end of your weaving journey, remember that attention to detail is crucial, and those final threads are what bring your entire piece together, making it a true work of art
Securing your edges with precision and adding decorative trim with flair can elevate your weaving from a simple craft project to a stunning piece of textile art, worthy of display
By embracing the process of completion as an integral part of your weaving experience, you’ll find that the final stages are not just about finishing a project, but about bringing your unique vision to life, one intentional stitch at a time
The Final Touch
As you weave the last thread, remember that completion is not just about finishing, but about revealing the essence of the fabric – the harmony of texture, color, and form that makes a piece truly alive.
Ethan Thorne
Weaving a Lasting Impression
As you complete your weaving project, remember to secure those final threads with the same care and attention to detail that you devoted to the initial warp and weft. This is where the magic of texture and form comes together, and it’s essential to maintain the integrity of your piece. By mastering the art of completion, including securing edges with precision and adding decorative trim with flair, you’ll elevate your weaving from a mere craft project to a true work of art. Take a step back to admire your handiwork, and you’ll see how each element contributes to the overall aesthetic, from the subtle play of light on the fibers to the satisfying clickety-clack of the loom’s quiet rhythm still echoing in your mind.
Your finished weaving is more than just a piece of fabric – it’s a testament to your creativity and a reflection of your unique perspective. As you gaze upon the intricate patterns and textures you’ve created, remember that the true beauty of weaving lies not just in the end result, but in the journey itself. The gentle tug of the yarn, the soft whisper of the shuttle, and the satisfying thud of the beater all blend together to create an experience that’s both meditative and exhilarating. So don’t be afraid to experiment, to push the boundaries of what’s possible with thread and yarn, and to weave your own story, one intentional stitch at a time.
Frequently Asked Questions
What are some common mistakes to avoid when securing the edges of a weaving to prevent fraying or loose threads?
When securing edges, I’ve found that rushing the process or using too little tension can lead to fraying or loose threads. It’s essential to work slowly and methodically, ensuring each thread is tightly woven and evenly spaced. A simple overestimation of the finishing thread’s strength can also cause issues, so double-checking your work is crucial.
How do I choose the right decorative trim to complement the colors and textures in my weaving without overpowering it?
When selecting decorative trim, I consider it akin to choosing the perfect accent in a well-designed room. Look for trim that whispers, not shouts – a subtle echo of your weaving’s colors and textures. Allow the trim to enhance, not overwhelm, the piece, much like a delicate border on a beautifully crafted blueprint.
What are some alternative methods for finishing a weaving if I don't have access to a sewing machine or other specialized equipment?
For a more organic finish, try hand-stitching or whipstitching your edges, or even incorporating a simple fringe. You can also use a traditional technique like twisting or braiding the warp ends to create a beautiful, textured closure. These methods may take a bit more time, but they add a personal touch to your woven piece.