I still remember the first time I tried to block a handmade sock without a sock blocker – it was a disaster. The shape was all wrong, and the fabric looked like it had been put through a wringer. As a seasoned knitter and former yarn store owner, I’ve learned that a good a guide to using a sock blocker is essential for achieving professional-looking results. The myth that sock blockers are only for perfectionists is just that – a myth. In reality, using a sock blocker is a simple step that can make all the difference in the world.
In this article, I’ll share my no-nonsense advice on how to use a sock blocker to achieve perfectly shaped handmade socks. I’ll walk you through the process, from choosing the right blocker to troubleshooting common mistakes. You’ll learn how to properly block your socks to maintain their shape and texture, and how to make the most of your a guide to using a sock blocker. By the end of this guide, you’ll be equipped with the knowledge and confidence to take your sock-knitting game to the next level.
Table of Contents
Guide Overview: What You'll Need

Total Time: 1 hour 15 minutes
Estimated Cost: $10 – $20
Difficulty Level: Easy
Tools Required
- Measuring Tape (for measuring sock length)
- Scissors (for trimming excess yarn)
- Sock Blocker (the actual blocker)
- Yarn Needle (for weaving in ends)
Supplies & Materials
- Socks (to be blocked)
- Blocking Pins (for securing socks to blocker)
- Towel (for drying socks)
- Measuring Ruler (12 inches long, for ensuring even blocking)
Step-by-Step Instructions
- 1. First, let’s start with the basics: to use a sock blocker, you’ll need to have your freshly knitted socks ready to be shaped. I always recommend washing and drying your socks before blocking, as this will help even out the fibers and give you a more accurate fit. Take your socks and submerge them in cold water, gently swishing them around to remove any excess dye or knitting debris.
- 2. Next, gently squeeze out excess water from your socks without wringing or twisting them, as this can cause unwanted stretching. You want to remove just enough water so that your socks are damp, but not soaking wet. I like to use a clean towel to gently blot my socks and remove any excess moisture.
- 3. Now it’s time to prepare your sock blocker. Take the blocker and flatten it out on a flat surface, making sure all the pieces are securely attached. If your blocker comes with adjustable pieces, make sure they’re set to the correct size for your socks. I always double-check the measurements to ensure a perfect fit.
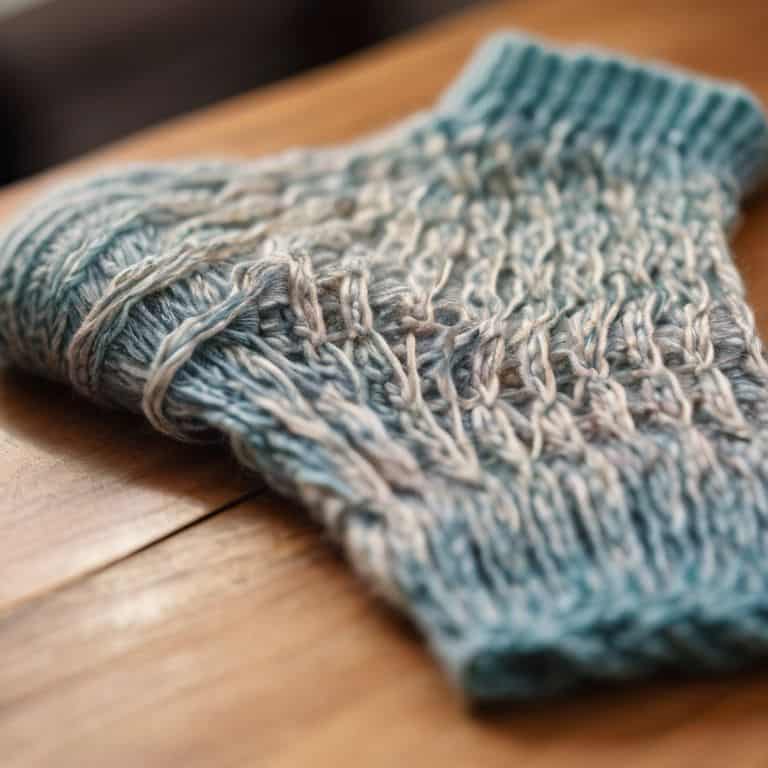
- 4. Place your damp sock over the blocker, starting at the toe and working your way up. Make sure to smooth out any wrinkles or air pockets as you go, as these can cause uneven drying and shaping. I like to use my fingers to gently pull the fabric taut, making sure it’s evenly distributed over the blocker.
- 5. Once your sock is securely in place, use T-pins to hold it in position. Start at the top of the sock and work your way down, making sure to pin the fabric taut but not too tight. You want to allow for a bit of give so that the sock can dry naturally without becoming misshapen.
- 6. Repeat the process for the second sock, making sure to match the orientation of the first sock. This will ensure that your socks dry evenly and are ready to wear at the same time. I always like to place my blocked socks in a single layer on a drying rack, allowing air to circulate around them for even drying.
- 7. Finally, allow your socks to air dry completely, away from direct sunlight or heat. This can take several hours or overnight, depending on the thickness of your socks and the ambient temperature. I like to check on my socks periodically to make sure they’re drying evenly and not developing any musty smells. Once they’re dry, you can remove them from the blocker and enjoy your perfectly shaped, handmade socks.
A Guide to Using a Sock Blocker
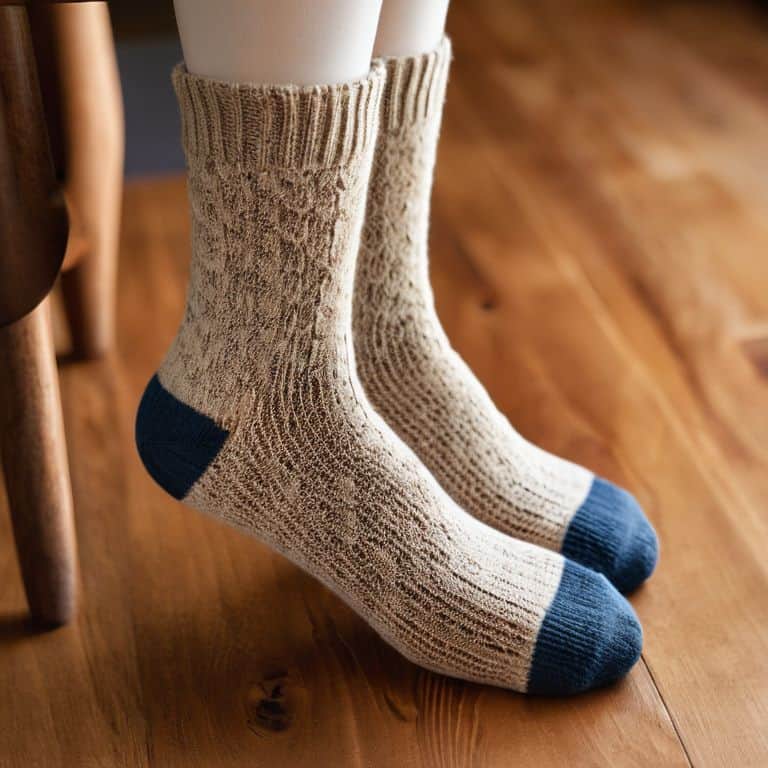
As I’ve worked with countless knitters over the years, I’ve seen how blocking and drying socks can make all the difference in the finished product. It’s not just about getting the socks to dry, but also about giving them a professional finish. When you use a sock blocker, you’re ensuring that your handmade socks will have even sizing, which is essential for comfort and durability. I’ve found that this step is often overlooked, but it’s crucial for creating socks that will last.
One of the most significant sock blocker benefits for knitters is the ability to achieve consistent sizing. This is especially important if you’re planning to sell your handmade socks or give them as gifts. By using a sock blocker, you can ensure that each sock is identical in size and shape, which can be a major selling point. I’ve also found that using a sock blocker helps to prevent sock stretch, which can cause the socks to lose their shape over time.
When it comes to choosing the right sock blocker size, there are a few things to consider. You’ll want to make sure that the blocker is large enough to accommodate the foot length of the sock, but not so large that it causes the sock to stretch excessively. I’ve found that tips for choosing the right sock blocker size can make all the difference in the finished product. By taking the time to select the right size, you can ensure that your handmade socks will fit perfectly and look professional.
Blocking and Drying Sock Secrets
When it comes to blocking and drying your handmade socks, there are a few secrets to keep in mind. I’ve found that gently shaping the socks over the blocker, rather than stretching them tight, helps maintain the fabric’s integrity. It’s also essential to allow the socks to air dry away from direct sunlight, as this can cause fading or discoloration. I like to dry mine on a towel-lined shelf, where they can breathe and dry slowly.
By taking the time to properly block and dry your socks, you’ll be rewarded with a pair that fits beautifully and lasts for years to come. Trust me, it’s worth the extra effort – I’ve seen too many handmade socks lose their shape or develop unsightly wrinkles due to rushed drying. With a little patience and care, your socks will remain soft, comfortable, and looking their best.
Choosing the Right Blocker Size Matters
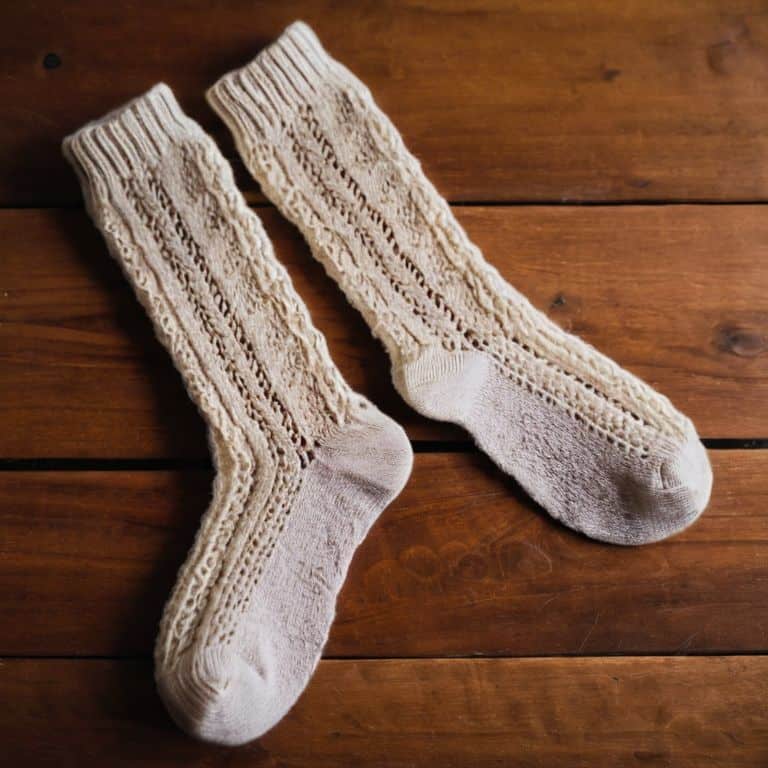
When it comes to selecting a sock blocker, size is everything. I’ve learned the hard way that using a blocker that’s too small can lead to misshapen socks, while one that’s too large can cause them to lose their definition. My rule of thumb is to choose a blocker that’s just slightly larger than the finished sock. This ensures a smooth, even shape without stretching out the fabric. Over the years, I’ve accumulated a collection of blockers in various sizes to accommodate different yarn weights and sock styles.
For example, my trusty wooden blockers in sizes small and medium are perfect for fingering weight yarns, while my larger plastic blockers are better suited for thicker, worsted weight yarns. By having the right size blocker on hand, you can ensure your handmade socks retain their shape and look professional.
Sock Blocker Savvy: 5 Tips for Perfectly Shaped Handmades
- Make sure to choose a sock blocker that’s specifically designed for the type of socks you’re making – yes, it matters, and I’ve learned that the hard way!
- Always, always, always block your socks as soon as possible after finishing them, while the yarn still has that lovely ‘new’ bounce to it
- Don’t be afraid to get creative with your sock blocker – I’ve used mine to shape everything from baby booties to intricate lace shawls
- Pay attention to the material your sock blocker is made of – I swear by my wooden ones, but some people prefer plastic or even 3D-printed blockers
- If you’re new to using a sock blocker, start with a simple pair of socks and work your way up to more complex patterns – trust me, your socks (and your sanity) will thank you
Key Takeaways for a Perfect Sock Block
Always choose a sock blocker that matches your sock size for a precise fit, and consider the material – I swear by my wooden ones for their durability and gentle touch on delicate fibers
Don’t underestimate the power of proper blocking and drying techniques – it’s not just about soaking your socks, but also about how you shape and dry them to prevent pilling and ensure they retain their shape over time
Remember, a good sock blocker is an investment, not an expense – it will make all the difference in the longevity and professional finish of your handmade socks, and it’s worth taking the time to find the right one for your needs
The Sock Blocker Wisdom
A good sock blocker is not just a tool, it’s a guardian of your knitting sanity – it’s the difference between a pair of socks that looks like it was made by a pro, and one that looks like it was made by a sleepy amateur, trust me, I’ve been there!
Audrey Vance
Unlocking the Full Potential of Your Handmade Socks
As we’ve explored in this guide to using a sock blocker, the key to achieving professional-looking results lies in the combination of proper blocking and drying techniques and choosing the right blocker size for your project. By following these steps and considering factors such as yarn type and sock shape, you’ll be well on your way to creating handmade socks that are not only comfortable but also visually appealing. Remember, the art of sock making is all about the details, and using a sock blocker is one of those details that can elevate your craft from good to great.
So, the next time you’re finishing up a pair of handmade socks, don’t be tempted to skip the blocking step – instead, take the time to block those socks and watch how it transforms the entire garment. With practice and patience, you’ll develop a keen eye for the nuances of sock blocking, and your creations will be all the more beautiful and durable for it. Happy knitting, and I look forward to sharing more fiber arts wisdom with you in the future!
Frequently Asked Questions
What happens if I use a sock blocker that's too small for my handmade socks?
Honestly, using a sock blocker that’s too small can lead to uneven stretching and distortion. I’ve been there – my handmade socks ended up misshapen and lost their charm. Trust me, it’s worth investing in the right size to ensure your socks retain their shape and look fabulous.
Can I use a sock blocker for other types of knitted items, like gloves or hats?
While a sock blocker is designed specifically for, well, socks, I’ve successfully used mine to shape and dry other small items like gloves and baby hats. Just be sure to choose a blocker that’s appropriately sized for the item, and don’t be afraid to get creative – it’s all about finding new uses for your tools!
How do I clean and store my sock blocker to make it last longer?
To keep your sock blocker in top shape, gently hand wash it with mild soap and let it air dry. For storage, I recommend wrapping it in a soft cloth to prevent scratches and dust buildup – trust me, it’s worth the extra care to make it last for years to come!