
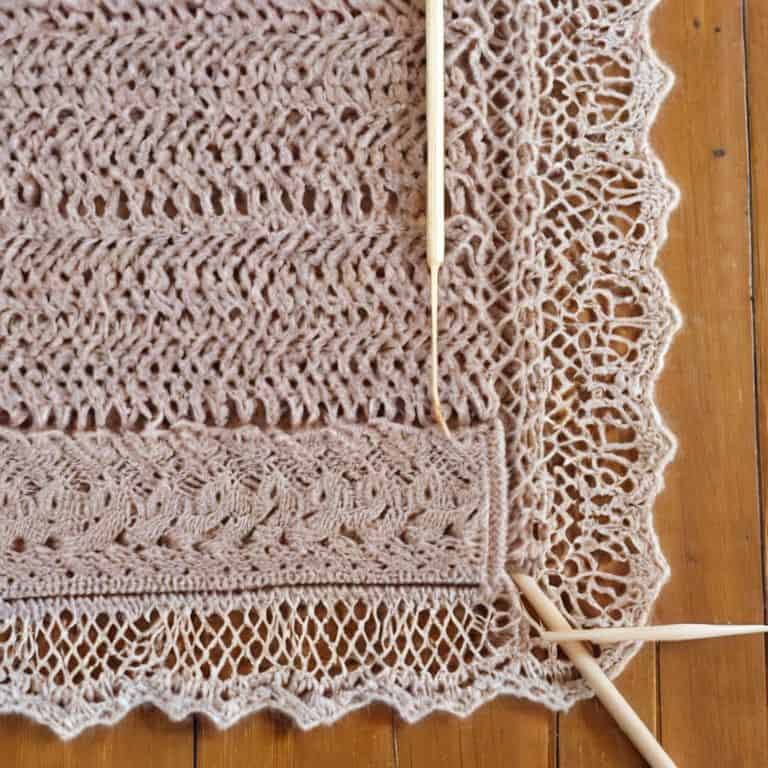
I still remember the first time I realized the power of a guide to blocking tools in transforming my knitting projects from good to great. It was like a lightbulb moment – I had spent hours pouring my heart into a beautiful lace shawl, only to have it emerge from the needles looking more like a crumpled mess than a work of art. But with the right blocking tools and techniques, I was able to coax it into a stunning, museum-worthy masterpiece. The difference was nothing short of magical, and it’s a lesson that has stuck with me to this day.
As a seasoned fiber artist, I’ve learned that having the right blocking tools can make all the difference in the world. In this article, I’ll be sharing my honest and practical advice on how to choose and use the best blocking tools for your projects. From the basics of why blocking is essential to the nitty-gritty of how to get the best results, I’ll be covering it all. You can expect to learn about the different types of blocking tools available, how to use them to achieve professional-looking results, and some of my favorite tips and tricks for getting the most out of your yarn and needles. Whether you’re a beginner or an experienced maker, my goal is to provide you with the knowledge and confidence to take your projects to the next level.
Table of Contents
Guide Overview: What You'll Need
Total Time: 1 hour 15 minutes
Estimated Cost: $15 – $30
Difficulty Level: Easy
Tools Required
- Clamp (at least 2 inches wide)
- Drill (with screwdriver bits)
- Hammer (16 ounces)
- Measuring Tape (25 feet long)
- Square (6 inches x 6 inches)
- Utility Knife (with extra blades)
Supplies & Materials
- 1-in x 4-in Lumber (8 feet long)
- 2-in x 4-in Lumber (8 feet long)
- Wood Glue (8 ounces)
- Wood Screws (1 inch long)
- Sandpaper (120-grit)
Step-by-Step Instructions
- 1. First, gather your materials, including the project you want to block, a measuring tape or ruler, and your chosen blocking tools – I personally swear by a good set of blocking pins and a sturdy blocking mat that can withstand repeated use and the occasional pin prick.
- 2. Next, prepare your project by giving it a good wet soak in cold water, making sure it’s fully saturated but not dripping wet – this step is crucial for even blocking and to prevent over-stretching, which can lead to pilling or distortion over time.
- 3. Lay out your blocking mat on a flat surface, ensuring it’s large enough to accommodate your project with some extra room around the edges for pinning – I’ve found that using a mat with a grid can be incredibly helpful for achieving symmetrical blocking and saving time in the long run.
- 4. Gently place your soaked project onto the blocking mat, smoothing out any wrinkles or air pockets as you go – it’s essential to work slowly and methodically to avoid stretching or distorting the fabric, especially if you’re working with a delicate or specialty yarn.
- 5. Using your measuring tape or ruler, measure and mark the dimensions you want your project to block to, taking into account the natural stretch and recovery of the yarn – for example, if you’re blocking a lace shawl, you may want to block it to a larger size to showcase the intricate stitchwork.
- 6. Beginning at the center of your project, start pinning it to the mat, working your way outwards in a systematic pattern to maintain even tension and prevent puckering or ridging – I like to use a combination of T-pins and straight pins to get into tight spaces and achieve a smooth finish.
- 7. Once your project is fully pinned, allow it to dry completely, which can take anywhere from a few hours to several days, depending on the thickness of the project and the ambient temperature and humidity – be patient, as rushing this step can lead to a less-than-desirable finish or, worse, felted fibers.
- 8. After your project is dry, remove the pins and gently steam it to relax the fibers and set the block – this step can help even out any minor imperfections and give your project a professional, finished look that will make it truly stand out.
A Guide to Blocking Tools
As I delve into the world of blocking tools, I’ve come to realize that mastering the art of blocking is just as important as choosing the right yarn or pattern. One of the most crucial steps in this process is selecting the right blocking mats for knitting, as they provide a stable and even surface for your project. I’ve found that investing in a high-quality mat can make all the difference in achieving professional-looking results.
When it comes to types of blocking wires, I’ve had my fair share of trials and errors. Through my experiments, I’ve discovered that the right wire can help you achieve the perfect shape and drape for your garment. To get the most out of your blocking wires, I recommend checking out some blocking tool tutorials online, which can provide valuable tips and tricks for using them effectively.
In my experience, how to use blocking pins effectively is an often-overlooked aspect of the blocking process. However, with a little practice, you can learn to use them to achieve a crisp, polished finish. Additionally, using a good wool wash for blocking can help bring out the natural texture and color of your yarn, making your finished project look truly stunning. By combining these techniques with the right tools, you’ll be well on your way to creating beautiful, long-lasting pieces that you’ll treasure for years to come.
Benefits of Blocking Mats
I’ve had the pleasure of working with various blocking mats over the years, and I can confidently say they’re a game-changer. Not only do they provide a smooth, even surface for laying out your work, but they also help prevent stretching or distorting the fabric. This is especially crucial for delicate or intricate pieces that require precise shaping. A good blocking mat can make all the difference in achieving a professional finish.
In my experience, blocking mats have saved me from countless hours of frustration and rework. They’re an investment that pays for itself in the long run, allowing me to focus on the creative aspects of my craft rather than wrestling with stubborn fibers or uneven tension. Whether you’re a seasoned pro or just starting out, I highly recommend adding a quality blocking mat to your toolkit – it’s a decision you won’t regret.
Unraveling Blocking Tool Tutorials
When it comes to blocking tool tutorials, I’ve found that a picture is worth a thousand words. I love watching experienced blockers share their techniques on YouTube, and I’ve learned a thing or two from fiber artists who specialize in intricate lace shawls. One of my favorite tips is to use a combination of blocking pins and wires to achieve a crisp, professional finish. It’s amazing how much of a difference it can make in the overall appearance of your finished project.
I’ve also experimented with different blocking surfaces, from homemade boards to expensive commercial mats. In my opinion, the key to successful blocking is finding a surface that works for you and your unique needs. Whether you’re a beginner or an experienced maker, taking the time to invest in quality blocking tools and tutorials can make all the difference in the world.
5 Essential Tips for Mastering Blocking Tools

- Always invest in a high-quality blocking mat that provides excellent grip and durability, trust me, it’s worth the extra cost
- Choose the right size of blocking pins for your project, too small and they won’t hold, too large and they’ll leave noticeable holes
- Don’t underestimate the power of a good blocking wire, it can make all the difference in achieving a professional finish
- Make sure to read the care instructions for your yarn before blocking, some fibers require special treatment to prevent felting or color bleeding
- Take your time when blocking, it’s a process that requires patience, but the end result is well worth the effort, your finished project will thank you
Key Takeaways for Mastering Blocking Tools
I’ve found that investing in a high-quality blocking mat is essential for achieving professional-looking results, as it provides a stable and even surface for your projects
Using the right blocking pins can make all the difference in preventing damage to your yarn and ensuring a smooth, stress-free blocking process – I swear by my trusty T-pins
Remember, blocking is not just about aesthetics – it’s also crucial for setting the shape and texture of your finished pieces, so don’t skimp on this step if you want your creations to stand the test of time
The Blocking Tool Revolution
A good blocking tool is not just a utility, it’s a guardian of your craft’s integrity – it’s what stands between a homemade hug and a masterpiece that will be treasured for generations.
Audrey Vance
Conclusion: Elevating Your Craft with Blocking Tools
As we’ve explored in this guide to blocking tools, the right equipment can make all the difference in achieving professional-looking results. From blocking mats to pins and wires, each tool plays a crucial role in helping you create timeless, museum-worthy masterpieces. By understanding the benefits of blocking mats, such as their ability to prevent stretching and distortion, and by following the step-by-step instructions provided, you’ll be well on your way to unlocking the full potential of your knitting and crochet projects. Whether you’re a seasoned maker or just starting out, investing in quality blocking tools is an investment in your craft and your creativity.
As you continue on your fiber journey, remember that the tools you use are an extension of your own unique vision and artistic expression. Don’t be afraid to experiment, try new things, and push the boundaries of what’s possible with your craft. With the right blocking tools by your side, you’ll be empowered to bring your most ambitious projects to life, and to share your passion with the world. So go ahead, take the leap, and watch your creations flourish with the help of these incredible tools.
Frequently Asked Questions
What are the most essential features to look for when choosing a blocking mat for my knitting or crochet projects?
When selecting a blocking mat, I look for durability, grip, and ease of cleaning. A good mat should withstand repeated use and pinning without showing signs of wear. I also consider the size and portability, as well as the material’s resistance to water and moisture.
How do I properly care for and maintain my blocking tools to ensure they last a long time?
To keep your blocking tools in top shape, I swear by regular cleaning and storage. For mats, a soft brush and mild soap do the trick, while pins and wires can be wiped down with a dry cloth. Store them in a dry, cool place to prevent warping or rust. Trust me, a little TLC goes a long way in extending their lifespan.
Can I use alternative materials as a substitute for a traditional blocking mat, and if so, what are some common household items that could work?
While I swear by my trusty blocking mat, I’ve found that a thick, absorbent towel or even a piece of cardboard can work in a pinch. Just be sure to cover it with a damp cloth to prevent pilling or snagging your fabric.